I just got a new Chromebook and was playing around with it. I wanted to take a screenshot of my desktop, not realizing that there were no keys for this on the Chromebook! It turns out that I wasn’t the only one who had this question – other people searching for How to Screenshot on Chromebook Without Windows Key? There are other ways to do this, I ended up finding another way to capture the screen other than depending on the combination of keys.
In this article, I am going to help you with how to take screenshots on Chromebooks without using a keyboard button or any keys I will also show you where to find your Chromebook screenshots. So let’s start the discussion.
Here’s what you’ll need to do to take targeted or fullscreen screenshots on your Chromebook:
Table of Contents
How to Screenshot on Chromebook Without Windows Key
The key to taking screenshots is the “Show all your open windows” button, which looks like a box with two lines to the right side of it.
It’s located in the top row of your keyboard, next to the “decrease screen brightness button,” which looks like a small gear icon.
Here’s how to use that button to take screenshots in two ways.
- To take a screenshot of the entire screen: Press the “Shift” key and the “Show all open windows” button.
- To take a screenshot of a part of the screen: Press the “Shift” and “Ctrl” keys as well as the “Show all open windows” button, then use your cursor to click and drag open a box around the area you want to capture.
When you take any kind of screenshot, you’ll see an image of the screenshot appear at the bottom of your screen.

How to Screenshot on Chromebook Touchscreen with the Whole Screen
The most common way to take a screenshot with a Chromebook is to grab the whole screen, and your Chromebook can do this easily enough by pressing the Ctrl + to show the windows key (this is the function key with the rectangle and two trailing lines, positioned between the full-screen and reduce brightness keys. If it was a traditional function key it would be F5).
Once you’ve pressed these keys, ChromeOS (the operating system Chromebooks run on) pops up a notification displaying the grab that has been taken.
This will stay visible for around 10 seconds before it clears itself. The automatic filename contains the date and time.
How to capture part of the screen
Chromebooks offer two more built-in screenshot modes: cropped to an area and the current window, though this last one isn’t a documented feature so we’re not sure how widespread support is.
To grab a cropped area press Ctrl + Shift + show window keys. The mouse cursor will change to a crosshair, this enables you to draw a rectangle around the area you would like to capture.
We discovered you can also easily capture select windows by pressing the Ctrl + Alt+ show window keys. The next window you click on will be captured in a screenshot.
How to screenshot on a Chromebook using the clipboard
If you’re used to how Windows 10 handles screenshots – that’s to say when you press the Print Screen key it’s copied directly to the clipboard rather than it being saved automatically – then you can mimic this behaviour with your Chromebook… to an extent.
When you take a screenshot on a Chromebook, take a close look at the notification that pops up showing the screengrab. At the bottom of this is a ‘Copy to clipboard button.
Click this and then grab is now available to paste into any documents you’re working on or for manipulating in any image editor you’re using.
Where to find your Chromebook screenshots
What if you’ve gone on a screengrab frenzy and stacked up a load of Chromebook screenshots in a row and now want to go back and peruse them to root out all the bad ones and select the ones you want to keep? The short answer is that Chromebook screengrabs are stored in the Downloads folder as PNG files.
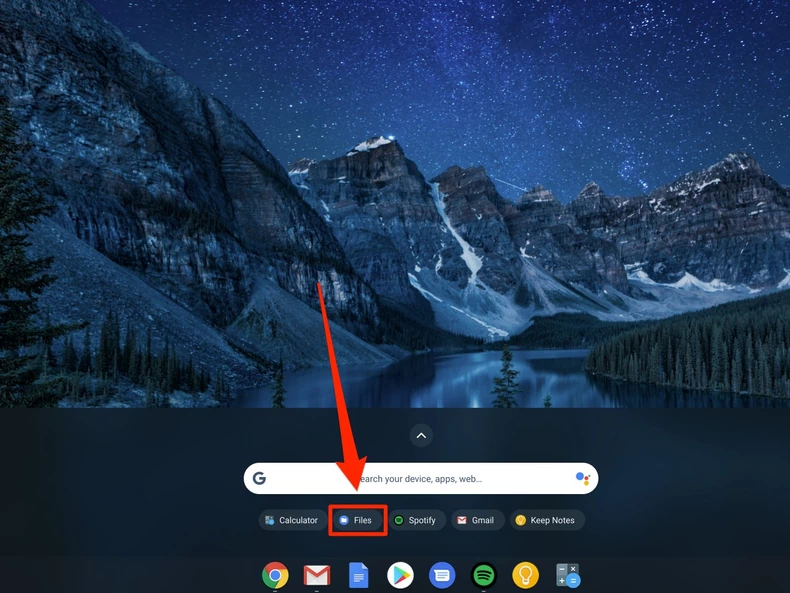
If you’re not sure how to find those tap the ‘Search’ button, type ‘files’, open the Files app and click ‘Downloads’ in the left-hand shortcut list.
Other ways to screenshot on a Chromebook
Have a Chromebook that doesn’t have those function keys? Don’t worry you can still capture screengrabs on ChromeOS tablets – this is done in a similar way to Android. Just press the power button and volume down keys at the same time.
If you don’t have this access to a keyboard or even the power button then you can take a grab via the Chrome browser menu by selecting Menu > More tools > Take a screenshot. Advertisement
Unfortunately, there’s no option to crop or capture a window directly using this menu function.
Hope you found this article helpful. If you have other issues with your Chromebook comment down below.