How to create bat file? It is true that, Windows Command Prompt uses the .bat extension for the batch files. Bat file acts as a task runner which is redirected from the command prompt. Bat is a short from “batch processing,” is a kind of text file that contains a series of commands used in MS-DOS and Windows. This file executes multiple applications with a single activation by just just double-clicking on the .bat. For example, when you update any windows automatically update tool checks for windows updates and downloads windows updates when it is required for your windows version. These abilities help to reduce the workloads in windows through this sample batch file creation which can be used in various ways
Creating your own batch files can be extremely useful when you are in a rush, or when you are trying to run a specific file that has multiple exe’s in it. If you are looking to create a Bat File that contains parameters, then take a look at this easy to follow guide on how to create Bat Files containing Parameters
On Windows 10, a batch file typically has a “.bat” extension, and it is a special text file that includes one or multiple commands that run in sequence to perform various actions with Command Prompt.
Although you can type commands manually to execute a particular task or change system settings on Windows 10, a batch file simplifies the work of having to re-type the commands, saving you time and avoiding mistakes.
You can also use other tools like PowerShell to write even more advanced scripts. However, running batch files in Command Prompt is still relevant to execute commands to change settings, automate routines, and start apps or launch websites on your device.
In this Windows 10 guide, we will walk you through the steps to create and run a batch file. Also, we will outline the steps to create advanced scripts and rum them automatically on schedule using the Task Scheduler.
Table of Contents
How to create a batch file on Windows 10
It is a simple process to create a batch file. You need only a text editor and some basic knowledge crafting commands with Command Prompt. The instructions below outline the steps to create a basic and advanced batch file and write a script to change system settings.
Create basic Windows 10 batch file
To create a basic batch file on Windows 10, use these steps:
- Open Start.
- Search for Notepad and click the top result to open the text editor.
- Type the following lines in the text file to create a batch file:
@ECHO OFF ECHO Congratulations! Your first batch file was executed successfully. PAUSESource: Windows Central The above script outputs the phrase, “Congratulations! Your first batch file was executed successfully,” on the terminal screen. Source: Windows Central- @ECHO OFF — Shows the message on a clean line disabling the display prompt. Typically, this line goes at the beginning of the file. (You can use the command without the “@” symbol, but using it hides the executing command to create a cleaner return.)
- ECHO — The command prints the text after the space on the screen.
- PAUSE — Allows the window to stay open after running the command. If you do not use this option, the window will close automatically as soon as the script finishes executing. You can use this command at the end of the script or after a specific command when running multiple tasks and want to pause between each task.
- Click the File menu.
- Select the Save as option.
- Confirm a name for the script — for example, first_basic_batch.bat. Quick note: While batch files typically use the .bat file extensions, you can also find them using the .cmd or .btm file extensions.
Once you complete the steps, you can double-click the file to run it. Alternatively, you can use the steps below to learn the different ways you can run a batch file on Windows 10 using Command Prompt, File Explorer, or Task Scheduler.
Create advanced Windows 10 batch file
To create an advanced batch file with multiple commands, use these steps:
- Open Start.
- Search for Notepad and click the top result to open the text editor.
- Type the following lines in the text file to create a more advanced Windows 10 batch file:
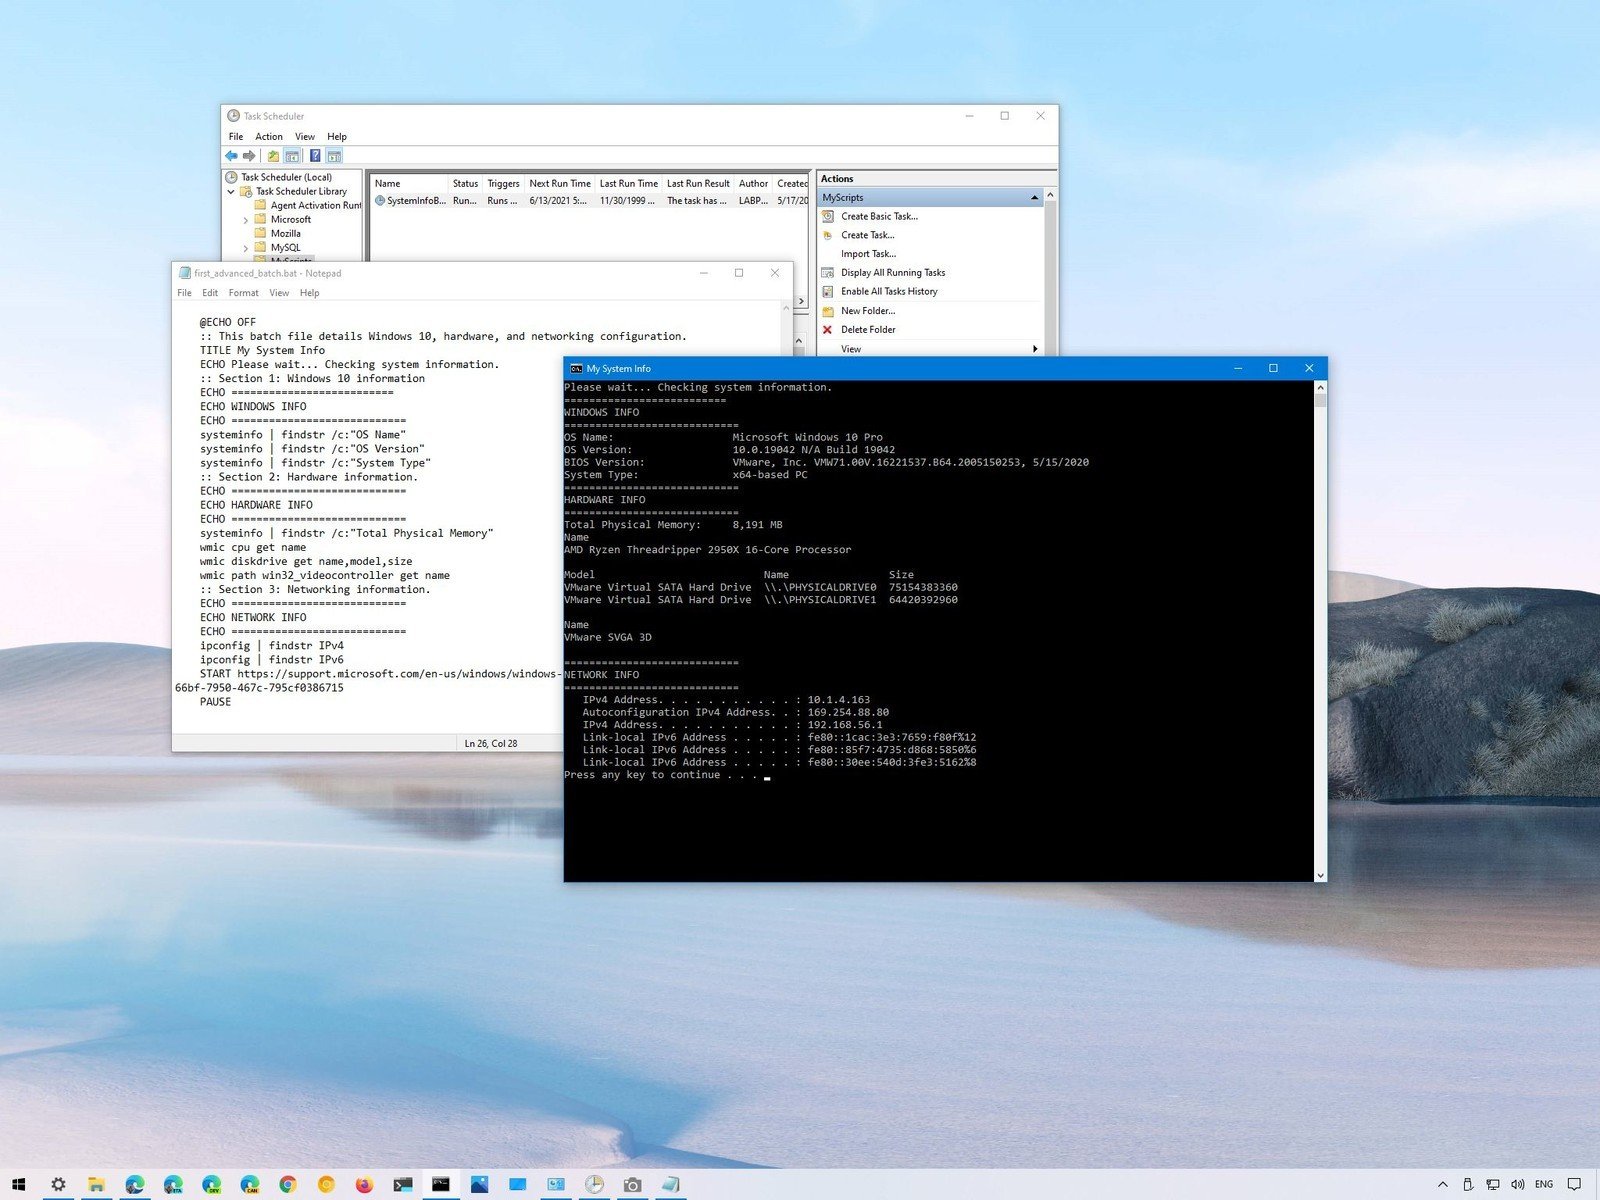
@ECHO OFF :: This batch file details Windows 10, hardware, and networking configuration. TITLE My System Info ECHO Please wait... Checking system information. :: Section 1: Windows 10 information ECHO ========================== ECHO WINDOWS INFO ECHO ============================ systeminfo | findstr /c:"OS Name" systeminfo | findstr /c:"OS Version" systeminfo | findstr /c:"System Type" :: Section 2: Hardware information. ECHO ============================ ECHO HARDWARE INFO ECHO ============================ systeminfo | findstr /c:"Total Physical Memory" wmic cpu get name wmic diskdrive get name,model,size wmic path win32_videocontroller get name :: Section 3: Networking information. ECHO ============================ ECHO NETWORK INFO ECHO ============================ ipconfig | findstr IPv4 ipconfig | findstr IPv6 START https://support.microsoft.com/en-us/windows/windows-10-system-requirements-6d4e9a79-66bf-7950-467c-795cf0386715 PAUSESource: Windows Central The above script executes each line to query a series of system information, and the result will be divided into three categories, including “WINDOWS INFO,” “HARDWARE INFO,” and “NETWORK INFO.” Also, the “START” command will open the web browser in the official support page outlining the Windows 10 system requirements, which you can check against your information. Source: Windows Central- @ECHO OFF — Shows the message on a clean line disabling the display prompt. Typically, this line goes at the beginning of the file.
- TITLE — Specifies a custom name in the title bar of the window.
- :: — Allows writing comments and documentation information. These details are ignored when the system runs the batch file.
- ECHO — The command prints the text after the space on the screen.
- START — Launches an app or website with the default web browser.
- PAUSE — Allows the window to stay open after running the command. If you do not use this option, the window will close automatically as soon as the script finishes executing.
- Click the File menu.
- Select the Save as option.
- Type a name for the script — for example, first_advanced_batch.bat.
After you complete the steps, double-click the .bat file to run it or use the steps below to execute the script with Command Prompt, File Explorer, or Task Scheduler.
Create actionable Windows 10 batch file
You can also write batch scripts for virtually any task that does not require user interaction. For example, to map a network drive, install an application, change system settings, and more.
To create a non-interactive batch file, use these steps:
- Open Start.
- Search for Notepad and click the top result to open the text editor.
- Type the following command to map a network drive in the text file:
net use z: \\PATH-NETWORK-SHARE\FOLDER-NAME /user:YOUR-USERNAME YOUR-PASSWORDSource: Windows Central In the command, replace the \PATH-NETWORK-SHARE\FOLDER-NAME for the network path for the folder you want to mount on the computer, and YOUR-USERNAME YOUR-PASSWORD with the username and password that grants access to the network files. This example maps a network folder as a drive inside File Explorer using the “Z” drive letter:net use z: \\10.1.4.118\shareoneSource: Windows Central Quick note: The screenshot includes the “pause” command, but this is not required. It was added in this example to take a screenshot of the terminal. If you are accessing the files from another computer that uses a specific username and password, do not forget to use the/user:option with the correct credentials. - Click the File menu.
- Select the Save as option.
- Confirm a name for the script — for example, mount-z-network-drive.bat.
Once you complete the steps, the batch file will map the network folder without opening a Command Prompt window.
We only demonstrate a script with a single command, but you can include as many as you like, as long as you write them one per line.
How to run a batch file on Windows 10
On Windows 10, there are at least three different ways to write batch files. You can run them on-demand using Command Prompt or File Explorer. You can configure the script to run it on schedule using the Task Scheduler console. Or you can save the batch files in the “Startup” folder, allowing Windows 10 to run them as soon as you sign into the account.
Run batch file on-demand
If you want to run a script on-demand, you have two choices, including File Explorer or Command Prompt.
Command Prompt
To run a script file with Command Prompt on Windows 10, use these steps.
- Open Start.
- Search for Command Prompt, right-click the top result, and select the Run as administrator option.
- Type the following command to run a batch file and press Enter:
C:\PATH\TO\FOLDER\BATCH-NAME.batIn the command, make sure to specify the path and name of the script. This example runs the batch file located in the “scripts” folder inside the “Downloads” folder:C:\Users\useraccount\Downloads\first_basic_batch.batSource: Windows Central
After you complete the steps, the console will return the results, and the window won’t close even if the script does not include the “PAUSE” command since you are invoking the script from within a console window that you opened manually.
File Explorer
To run a batch file with the Windows 10 File Explorer application, use these steps:
- Open File Explorer.
- Open the folder containing the batch file.
- Double-click the script file to run it.
- (Optional) If a command requires administrator privileges, you will need to run the script as an admin by right-clicking the file and selecting the Run as administrator option. Source: Windows Central
- Click the Yes button
Once you complete the steps, the script will run each command in sequence displaying the results in the console window.
Run batch files on startup
Windows 10 also includes a special folder known as “Startup” that the system checks every time it starts to run applications, shortcuts, and scripts automatically without the need for extra configuration.
To run a script on startup, use these steps:
- Open File Explorer.
- Open to the folder containing the batch file.
- Right-click the batch file and select the Copy option.
- Use the Windows key + R keyboard shortcut to open the Run command.
- Type the following command:
shell:startupSource: Windows Central - Click the OK button.
- Click the Paste option from the “Home” tab in the Startup folder. (Or click the Paste shortcut button to create a shortcut to the batch file.) Source: Copy and Paste Batch File startup folder
After you complete the steps, every time you sign into Windows 10, the batch file will execute automatically.
Run batch file on schedule
To use the Task Scheduler to run the batch file automatically on a schedule, use these steps:
- Open Start.
- Search for Task Scheduler and click the top result to open the app.
- Right-click the “Task Scheduler Library” branch and select the New Folder option.
- Confirm a name for the folder — for example, MyScripts. Quick note: It is not a requirement to create a folder, but it’s recommended to separate the system and your personal tasks.
- Click the OK button.
- Expand the “Task Scheduler Library” branch.
- Right-click the MyScripts folder.
- Select the Create Basic Task option. Source: Windows Central
- In the “Name” field, confirm a name for the task — for example, SystemInfoBatch. Source: Windows Central
- (Optional) In the “Description” field, write a description for the task.
- Click the Next button.
- Select the Monthly option. Source: Windows Central Quick note: On Windows 10, the Task Scheduler allows you to choose from different triggers, including a specific date, during startup, or when a user logs in to the device. In this example, we will select the option to run a task every month, but you may need to configure additional parameters depending on your situation.
- Click the Next button.
- Use the “Start” settings to confirm the day and time to run the task.
- Use the “Monthly” drop-down menu to pick the months of the year to run the task. Source: Windows Central
- Use the “Days” or “On” drop-down menu to confirm the days to run the task. Source: Windows Central
- Click the Next button.
- Select the Start a program option to run the batch file. Source: Windows Central
- In the “Program/script” field, click the Browse button.
- Select the batch file you want to execute. Source: Windows Central
- Click the Finish button.
Once you complete the steps, the task will save and run the script on your specified schedule.
Conclusion
A bat file is a simple plain text file that can contain various parameters, switches, and other commands that tell a computer what to do. Bat files allow you to create batch files without using any complicated programming language such as C++ or Java. The bat file is supported by all Windows operating systems and can be used on both GUI and command line interfaces.