How to create a zip file? When you have many files that are too large or just too important to email, or save on your hard drive, but they are not ready to archive in the cloud, you may need to create a zip file. A zip file is a compressed file that you can send anywhere so only one copy of the file is needed. Depending on your computer’s operating system, there will be different methods you can use to create a zip file.
A file with the ZIP file extension is a ZIP Compressed file and is the most widely used archive format you’ll run into.
A ZIP file, like other archive file formats, is simply a collection of one or more files and/or folders but is compressed into a single file for easy transportation and compression.
Table of Contents
ZIP File Uses
The most common use for ZIP files is for software downloads. Zipping a software program saves storage space on the server, decreases the time it takes for you to download it to your computer, and keeps the hundreds or thousands of files nicely organized in the single ZIP file.
Another example can be seen when downloading or sharing dozens of photos. Instead of sending each image individually over email or saving each image one by one from a website, the sender can put the files in a ZIP archive so that only one file needs to be transferred.
How to Create a Zip File
Method 1: Windows
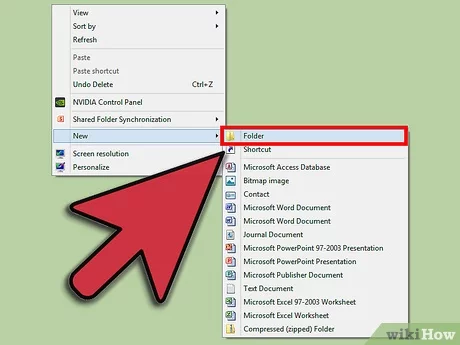
- Create a folder. The quickest way to create a zip file is to place all of the files that you want to archive into one folder. You can place multiple files and folders into the folder that you are creating the ZIP file from.
- Rename the folder to whatever you want the ZIP file to be named.
- Right-click on the folder. Hover your cursor over the “Send to” option. This will open a new submenu. Select “Compressed (zipped) folder”.
- You can also select multiple files in your file explorer, right-click on one of them, and then follow the above steps. The resulting ZIP file will contain all of the selected files and will be named after the file that you right-clicked on.
- Wait for the folder to be created. If you are adding a lot of files to the new ZIP file, it may take a few moments to create it. A progress bar will appear as files are added. Once the process is complete, the ZIP file will appear in the same location as the original folder.[1]https://9c8b4db5f89da16ba2194d1bddcfc865.safeframe.googlesyndication.com/safeframe/1-0-38/html/container.htmlAdvertisement
Method 2: Mac OS X
- Create a folder. The quickest way to create a zip file is to place all of the files that you want to archive into one folder. You can place multiple files and folders into the folder that you are creating the ZIP file from.
- Rename the folder to whatever you want the ZIP file to be named.
- Right-click on the folder. Click the “Compress” option. The folder will be compressed into a ZIP file. The new ZIP file will be located in the same location as the folder that you compressed.
- You can also select multiple files in your file explorer, right-click on one of them, and then follow the above steps. The resulting ZIP file will contain all of the selected files and will be named “Archive.zip”.Advertisement
Method 3: Linux
- Open the terminal. Its symbol looks like a black rectangle with some bright characters on it. On some platforms, it is called Konsole, xTerm, or something similar.
- Create a directory. This is done with the mkdir command, which takes the name of the directory as argument. If, for example, you want to create a directory “zipArchive”, write mkdir zipArchive.
- Move or copy all files that should be in the ZIP file into the directory.
- Files are moved with the mv command. Moving a file means that it is no longer in its original place, and instead in the place you specified.
- Copying a file is done with the cp command. It makes a copy of the file in the place you specified, but the same file is still on its original position. Note that you need to use cp -r to copy a directory.
- Both commands take the original position as first argument, and where to copy or move as second. For example, to move a file called “textToArchive.txt” to the directory “zipArchive”, write: mv textToArchive.txt zipArchive
- Zip the directory. This is done with the zip -r command. It takes the name of the zip file as first argument and the name of the folder to archive as second. If you, for example, want to archive the directory “zipArchive” to a zip file called “zipArchive.zip”, write: zip -r zipArchive.zip zipArchive. It will print out the names of all files it adds to the archive, so you can check whether everything you want to be included in the archive actually is there.Advertisement
Method 4: Password-Protected ZIP File
- Download a compression program. Newer versions of Windows cannot create password-protected ZIP files without installing additional software. Compression software is available both for free and for purchase, though you don’t need anything fancy to create a protected ZIP. The most popular programs include:
- 7-Zip
- IZArc
- PeaZip
- Create a new archive. Use your compression software to create a new ZIP file. Add the files that you want to compress. When you create the ZIP file, you will be given the option to enter a password. You will need to use this password to access this ZIP file in the future.
- Create a password-protected ZIP file in OS X. To create a password-protected Zip file in OS X, you can use the Terminal and you don’t need to download any other programs. First, place all of the files that you want to compress into a single folder, and then rename that folder to the name that you want your ZIP file to have.
- Open the Terminal. This can be found in the Utilities folder in your Applications folder.
- Navigate to where the folder that you want to compress is located.
- Enter the command:
zip –er <foldername>.zip <foldername>/* - Create a password. You will be asked to enter your password twice to verify it. Once you have entered the password, the ZIP file will be created.
Conclusion
Creating a zip file can be really helpful if you are transferring files between systems or if you are thinking of placing files on the internet for download. The reason for this is that you can easily compress all these files into one single file. This way the receiver only needs to click on the single file to decompress everything.