How to create a signature for Outlook, create signature in outlook 365 are the questions that have occurred to all of us at least once. And you are not alone if you are here looking how to create a signature in outlook. It is the question of many users. And not because they are unable to do it, but because they can’t find out the proper steps for creating a signature. How to create a signature in outlook?
No matter what email client you use, you can always add a signature to your emails. An email signature is a text block that provides useful information about you and your business. It’s a great way of promoting your products or services to your subscribers while improving communication with them.
Table of Contents
Method 1 On the Website Download Article
- Open Outlook. Go to https://www.outlook.com/ in your preferred web browser. This will open your Outlook inbox if you’re already signed into Outlook.
- If you aren’t signed into Outlook, enter your Microsoft email address (or phone number) and password to log in.
- Click Settings . This gear-shaped icon is in the upper-right side of your Outlook inbox. Doing so prompts a drop-down menu.
- Click Options. It’s at the bottom of the drop-down menu.
- Scroll down and click Email signature. This option is in the Layout section of the options on the left-hand side of the page.
- You may first have to click Layout to expand it in order to view the Email signature option.
- Enter your signature. Type your signature into the text box on the right side of the screen.
- Make sure your signature is active. Click the “Automatically include my signature on new messages I compose” box to place a checkmark in it. This will ensure that messages you compose from now on have your signature at the bottom of the message by default.
- You can also check the “Automatically include my signature on messages I forward or reply to” box to place your signature at the bottom of every email you send.
- Click Save. It’s in the top-left corner of the Email Signature section. This will save your changes and add a signature to your Outlook emails.
Method 2 On Mobile Download Article
- Open Outlook. This app is blue with a white envelope and a blue “O” on it.
- If you aren’t signed into Outlook, enter your Microsoft email address (or phone number) and password to log in.
- Tap ☰. It’s in the upper-left corner of the screen.
- Tap Settings . This option is in the bottom-left corner of the screen. Doing so opens the Outlook Settings menu.
- Tap Signature. It’s in the middle of the Settings page.
- Enter a new signature. Tap the current signature, then remove it and type in your own signature.
- Tap < (iPhone) or (Android). It’s in the top-left corner of the screen. This will save your settings and return you to the Settings page; your Outlook messages sent from your mobile device will now use your signature.
Method 3 On Desktop Download Article
- Open Outlook 2016. This program resembles a blue and white envelope with a white “O” on it.
- Click New Email. It’s on the far left side of the Home toolbar.
- Click Signature. This drop-down box is in the “Include” group of options in the Message toolbar.[1]
- Click Signatures. It’s in the Signature drop-down menu.
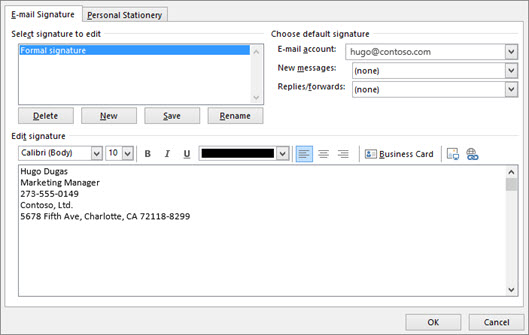
- Click New. This button is below the “Select signature to edit” text box in the upper-left side of the Signatures and Stationery window.
- Type in your name and click OK. This will create a name for your signature.[2]
- Enter your name. Do so in the “Edit signature” box at the bottom of the page.
- Enable your signature for new emails. Click the “New messages:” drop-down box in the top-right side of the Signatures and Stationery window, then click your name. This will automatically place your signature at the bottom of all new emails you send.
- You can repeat this process for the “Replies/forwards:” drop-down box to place your signature on every email you send, including replies and forwards.
- Click OK. It’s at the bottom of the window. Doing so saves your signature and applies it to all subsequent emails you send from the Outlook program.
Create and add an email signature in Outlook.com
Step 1
Open Outlook’s in-app editor

- Go to the search box at the top-left side of your Outlook screen and type in “signature”
- Click on the “Signature” result that appears
- Click on “Signature” from the dropdown menu and you’ll be prompted to set a signature in Outlook using the in-app signature editor.
Step 2
Create a new Outlook signature

- Click on the “New” button to create a new signature for your email
- Give your new signature a name (use a name that describes this specific signature well, in case you create multiples signatures in the future)
NOTE: If you already know you’ll need multiple Outlook signatures, go see our guide on how to create multiple Outlook signatures and how to manage them.
Step 3
Add your signature details

To begin with, we’ll create the simplest form of Outlook email signature – a simple text signature. This may be enough for you. But, in case you want something more professional, later on I’ll show you ways to create a much richer and effective email signature.
- To create your text signature click in the signature editor’s text field, and type in your full name, your job title, and your contact information.
- If you’re satisfied with this signature layout you can stop here. Simply click OK, and you’re good to go. For more advanced signature features, keep reading.
A good Outlook signature would include the following:
John L. Due
Associate Partner at Astoria Law Firm NY
1-800-800-800
301 Park Ave, New York, NY 10022
www.astoria-law-nyc.com
Note:
You can use the editor’s toolbar to add a table and organize your personal information in other ways. But tables can break in different device sizes, so make sure to keep your signature under 360px in width.Make yours
Step 4
Edit signature design

You can edit your Outlook signature to make it look more organized and give it a clear visual hierarchy, by setting different colors and font sizes for the most important information.
- To change the color of any text in your signature, all you need to do is select it with you cursor and click the Color dropdown menu > then pick your color, or click More colors (at the bottom of the panel) to choose a custom color.
- To change the text size – select the text then click the Font Size dropdown menu and try different sizes till you feel you’ve reached the best balance.
- To change font type – select any text and click the Font type dropdown, try some options till you find your fit.
TIPS:
- Choose 1 color from (preferably one of the colors you use for your brand).
- Use 1 font size for your contact details (12-14px is good), and use 1 bigger font size for your name and job title (2-3px greater than the text for your contact details). Set your name in Bold and your job title in Regular, to give slightly more importance to your name.
- Use only 1 font for your entire signature, otherwise it will look messy.
Step 5
Add a hyperlink to your Outlook signature

- To add a hyperlink to your Outlook signature, select any text with your cursor(when text is selected it should have a grey background)
- Then click the link icon in the right hand side of the tool strip.
- Now enter the URL you want the text to link to, and hit OK.
Make your telephone number clickable:
In the example image I made the telephone number clickable by adding a special kind of hyperlink.
- Instead of adding a URL, like before, I entered the phone number with the prefix “tel:”, like this – “tel:1-800-800-800”.
Make your local address clickable:
If you run a brick and mortar business you can also gain from making your address clickable. You can set it up so when clicked on, it brings up Google maps navigation.
- To add a clickable local address – find your business on Google Maps and hit the “Directions” button > then copy the URL from the address box.
- Select the address in your Outlook signature and click the link icon like before. Now add the URL you took from Google Maps, and click OK.
Step 6
Add an image

- Click your cursor where you want to place your signature image
- Click the image icon in the right hand side of the tool strip
- Upload the image from your computer
Resize the image:
- To resize your image according to your prefered signature design – click on the image and drag any of the black squares on the image corners.
Make your image clickable:
- Select your image with your cursor > then click the link icon from the tool strip > insert the URL you wish the image to link to and hit OK.
Add social media icons and links:
- To add your social media icons – follow the same steps as adding an image with a link as stated above
- Simply add them as images > drag them to the desired position > select the icon and click the link button from the tool strip to assign it the link to your social media page.
- For more professional look – see our more advanced guide on how to add social icons to your Outlook signature
Note:
You may have noticed that the signature in my example above is much richer than the simple Outlook signature we made during this guide. That’s because it’s structured in HTML, with some complex code.
But that wasn’t a problem, because I didn’t code it myself. I made it with WiseStamp signature creator. To get a beautiful professional signature in your Outlook in 2-5 minutes try our free Outlook Signature Creator.
If you like doing things yourself, and you’re not daunted by HTML, you can follow our guide for manually adding an HTML signature in Outlook.
But, you’ll be hard-pressed to make a signature like the one in the example using only the Outlook in-app signature editor.
Step 7
Set auto Outlook signatures

In order to add a signature to Outlook automatically, you are given a choice whether or not you want your signature to appear in your New messages and/or in your Forward and Reply messages. Doing this is fairly straightforward.
I) Go to the top-right corner of your Outlook editor
There you’ll find 2 dropdown menus, one for setting an auto signature for your New messages and one for your Forward/Reply messages. Each menu should house all your available signatures.
II) Choose the signature you wish to appear for each message type
If you feel that your Outlook signature is done, click “OK” to save your work. To see your new signature in Outlook, simply open a new message. Your new signature will appear at the bottom.
III) Manage your signatures directly from the Message window by clicking on the “Signature” button in the top ribbon. From there you will be able to choose the signature you required for any given email.
Conclusion
Signature plays a vital role in our life in both in personal and professional life. Many a times a signature is needed when sending a letter or an email along with any kind of transaction. Signature also helps to leave a mark on the text when we are writing any official document.