It’s rare that one organization holds all of the data you need to run your business. So what happens when you do need access to someone else’s data, like an innocent old Google Form? Should you go through hoops trying to convince people to give you access? Or should you be sneaky and try to find a hole in their email system? Forget all that –what if I told you there was a way to create your own Google Form so you had complete control over the results?
Have you ever wanted to create your own Google form or even create google forms for free? Learn about how to create a google form with this step-by-step tutorial.
Google Forms provides an easy way to create and send a basic business form in minutes. This step-by-step guide takes you through the process, and the pros and cons of the app.
In this article:
- Make a Google Form
- Customize a Google Form
- Master Google Forms advanced features
- See and manage Google Form responses
- Tips and tricks
Table of Contents
Getting Started with Google Forms
Google Forms started as a feature of Sheets in 2008 and became its own entity in 2016. The app is a straightforward way to send out a survey, query your customers, or request RSVPs for a gathering. The app is also useful for polling, job applications, collecting lunch orders for conference attendees, and event registration. You can also use a Google form to create a store checkout page, but you’ll need to include a link to PayPal, Square, or some other service to collect payment.
The following step-by-step instructions will help you learn to create a form, add questions, change the color theme and the font, add a background image, add a section, view responses, and more.
How to Create a Google Form
To use Forms, you need to be signed into your Gmail or Google Drive account.
Part 1: Creating the Form
- Go to https://docs.google.com/forms in your web browser. You can use any web browser on your computer to create a form in Google Forms. If you’re not already signed in to your Google account, sign in now.
- Click the “Blank” form. It’s the white square containing a plus (+) at the top-left corner of the page.
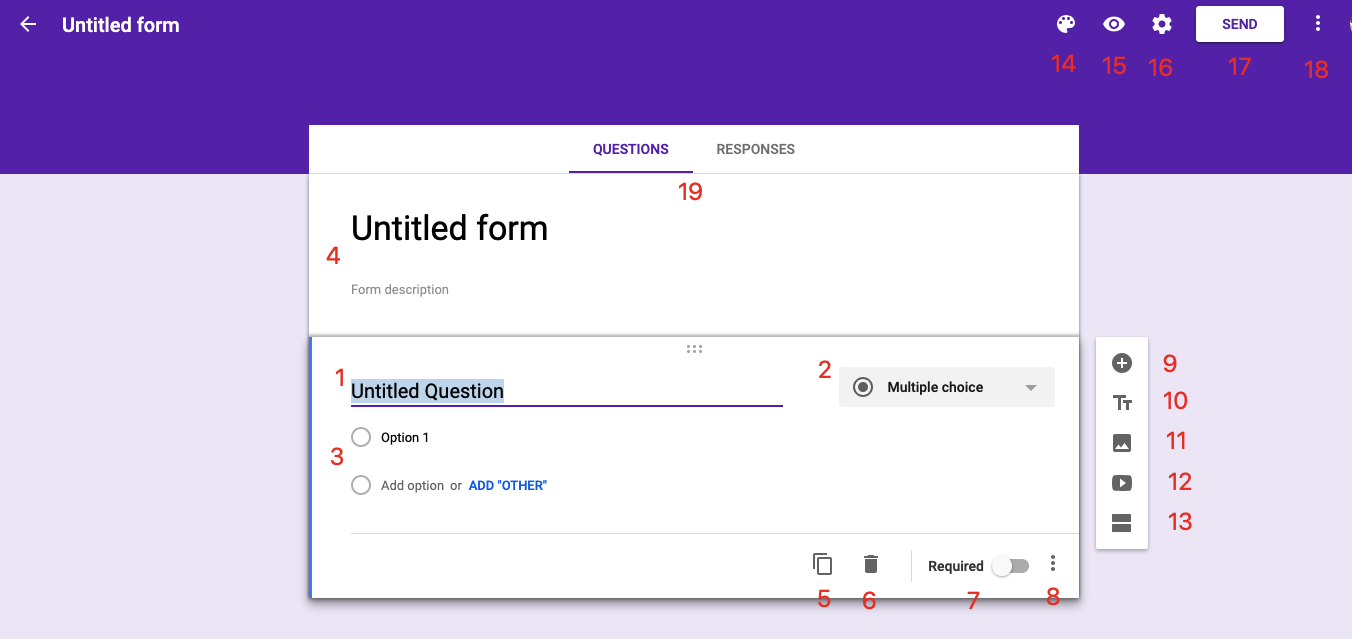
- Type a name for your form. This is the name that will appear at the top of your form. To start typing, click Untitled Form to highlight the text, then press Delete or ← Backspace.
- Type a description. This is optional, but you can describe the purpose of the form in the blank beneath the title.
- Your form will automatically save as you work.
Part 2: Adding Questions
- Enter your first question. Replace “Untitled Question” with the question you want to ask.
- Click the downward-pointing arrow next to “Multiple choice.” A list of response types will appear.
- Select the type of responses you want to allow. Here are a few examples:
- To provide a list of answers from which your users will select one, choose Multiple Choice (the default) or Dropdown.
- To allow more than one answer from a list, select Checkboxes.
- If the user must upload a file as their response, select File upload.
- Select Short Answer to allow users to type a sentence or two on a single line, or Paragraph to give space for a lengthier response.
- Select Date or Time to allow users to choose from or enter dates and times.
- Type possible answers. If you selected Multiple Choice, Dropdown, or Checkboxes, replace “Option 1” with the first possible answer. Then, add remaining choices the same way.
- To add an image as a possible answer, click the picture icon to the right of the answer blank, then select an image.
- Click ADD “OTHER” to add a typing area that can be used if no other answer applies to the user.
- Slide the “Required” switch to . This is optional, but you can use this switch if you don’t want to allow people to skip this question.
- Click + to create the next question. It’s at the top of the icon bar on the right side of the form. Now you can add another question the same way you did the first.
- You don’t have to stick to the same type of question (e.g. Checkboxes, Dropdown). Mix it up however you see fit.
- Add as many questions as you wish. The next section will describe other ways to spruce up your form.
Part 3: Adding Media and Sections
- Click the Section icon to break your form into sections. It’s at the bottom of the vertical icon bar on the right side of the form. This is optional, but can be helpful for longer forms, such as tests.
- Click the Text icon to add text between questions. It’s the upper and lower-case Ts in the vertical icon bar. This can be used to add section titles, words of encouragement, or anything you wish.
- Click the picture icon to add an image. Also optional, you can use this option to add logos or other images to the form. Once you find the image, click it, then click Select to add it. Here’s how you can add images:
- Click Choose an image to upload to add one from your computer.
- Click By URL to paste a URL to an image that’s online.
- Click Your Albums or Google Drive to select one from one of those locations.
- Click the video icon to add a video from YouTube. It’s the square with a triangle inside on the vertical icon bar. This opens a YouTube search window.
- Search for a video and then click to add it, or click URL to paste a URL directly.
Part 4: Sharing the Form
- Click SEND. It’s at the top-right corner of the form.
- Select a sharing method.
- Click the envelope to share via email. Enter the email address(es) of the desired recipients into the “To” field, type a subject and message, then click SEND.
- Click the link icon to get a URL that you can paste anywhere on the web.
- Click < > to get HTML code for the form to add to a website.
- Click a social media icon to share via your favorite social media account.
Conclusion
Google forms are used by many persons, organizations, companies and businesses of all sizes. The reasons behind their popularity are plenty. Luckily, the Google Docs platform is integrated with them so they are very accessible.