
How to Convert Heic to Jpg on Mac is what exactly we have been looking for. We can’t live without being so curious about how easy it is to be accomplished with the simplest ways possible, as well as how fast and effortless it can be done. In fact, if you are an Apple user, you mean that you have already understood what a must have it is to have that feature implemented in your preferred platform.
Heic files are relatively new files of photography. Apple created this format to compete with Jpeg. But, what is the difference between these two? And how can you convert heic file to jpg on mac so that you can use it on all of the devices. Let’s find out in this article!
HEIC is a new file format for image files introduced by Apple in 2017. Since the release of iOS 11, all the photos you capture on your iPhone or iPad use this new format for your images. While the format can be viewed on the iOS devices by default, you cannot view HEIC files on your Windows PCs and Macs since these do not have native support for it.
However, that does not mean there are no ways for you to access this format on your computer. One of the best ways to access HEIC on your computers is to convert your HEIC files to the popular JPG format. It should make your images viewable on almost all the devices out there. And the following is how you perform the conversion process.
Table of Contents
How to Convert HEIC to JPG on PC
If you are a Windows user, this section will teach you how to convert HEIC to JPG on a PC. Since Windows is developed by Microsoft and not Apple, your PC does not come with native support for the HEIC file format. Therefore, you need to first convert your HEIC images to a compatible format before you can access them on your machine.
However, there is a service by Apple that works equally well on Window PCs. It is called iCloud and it allows you to upload, keep, and download your files from the cloud. If you use the service for your HEIC files, the following is what you need to do to convert your HEIC to JPG on a PC.
Step 1. Log-in iCloud account and select photos to convert.
Open a browser on your PC and head over to the iCloud website. Log-in to your account and select the Photos option on the following screen.
Access Photos option on the iCloud website
Step 2. Convert the selected photos to JPG.
When your photos are loaded, select the files you want to download and click on the download icon at the top. Your files will be converted to JPG and then downloaded to your PC computer.
While the above procedure should work for everyone using iCloud, it will not work if your HEIC files are located outside iCloud. In that case, your best option is to use the HEIF Image Extensions app which will let you convert and access your HEIC files in the Photos app on your PC.
How to Convert HEIC to JPG on Mac
If you are a Mac user, this section will teach you how to convert HEIC to JPG on your Mac. Unfortunately, the extension that lets you convert and access HEIC files on Windows is not available for Mac. However, there are some other ways to convert HEIC to JPG on a Mac and the following is how you do it.
Step 1. Update to the latest MacOS version.
Click on the Apple logo at the top left corner of your screen and select About This Mac. On the screen that follows, click on the Software Update button to update the version of macOS to macOS High Sierra or later on your machine.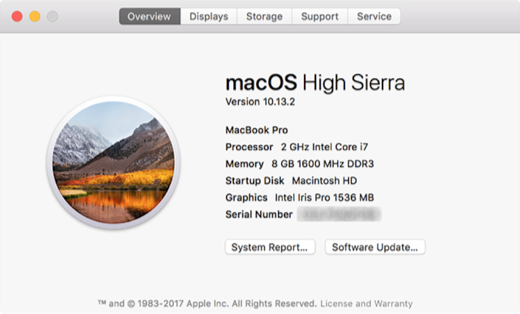
Update your Mac to the latest operating system version available
Step 2. Select the HEIC files and preview.
When the OS is updated, right-click on your HEIC file and select Open With followed by Preview. It will launch the file in the Preview app on your Mac.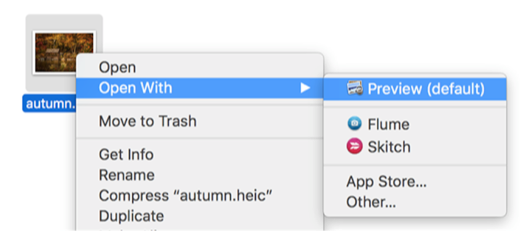
Open the HEIC file with Preview on Mac
Step 3. Export the selected HEIC files.
When the file opens in Preview, click on the File menu at the top and select Export. It will let you convert your HEIC to JPG.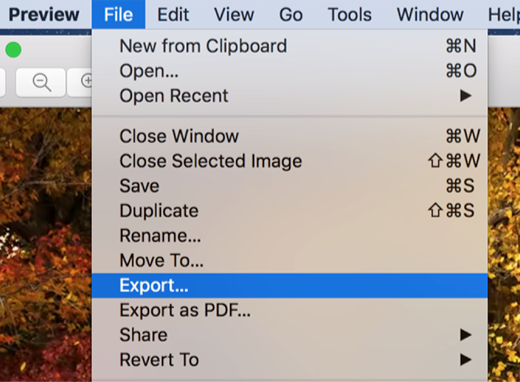
Export HEIC file from the Preview app on Mac
Step 4. Convert the HEIC files to JPG.
On the following screen, select JPEG from the Format dropdown menu. Then, click on the Save button to save the JPG version of your HEIC file.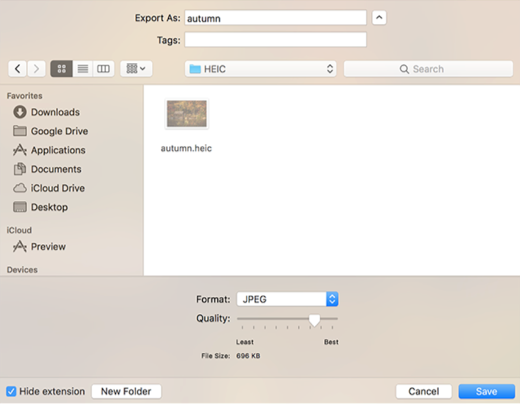
Convert HEIC to JPG on Mac using the Preview app
You should find the converted JPG file in your selected folder on your Mac. That is how you use Preview to convert HEIC to JPG on Mac machines.
How to change HEIC file to JPG with Photos
Apple’s Photos app enables you to manage all your pictures in one place. It can also be used to convert HEIC files to JPGs. Start by importing your HEIC images into Photos as usual. You can also drag images into the Photos app.

Select the images you want to convert, and simply click and drag them into any Finder window. They’ll automatically be converted to JPGs. You can do this with single images, or you can convert multiple HEIC files to JPG at once.

If you want more options, select your images as before, but this time, from the menu choose File > Export > Export Photos. Now, you can define other formats and your naming convention. You can also define your subfolder format.
How to convert HEIC to JPG on Mac with Automator
Automator is a built-in macOS app, which automates actions so you don’t have to keep doing them manually. This handy productivity tool can also be used to convert HEIC files to JPG format.

- To use Automator, start by opening it from the Applications folder. Depending on which version of macOS you’re running, you now need to select either Quick Action or Service, which is the cog icon. Click Choose

2. On the right-hand side you’ll see some dropdown menus. Find the one that says Workflow receives current or Service receives selected. Choose Image
3. On the left side of Automator, from the Actions list, select Library > Photos, and drag Change Type of Images into the grey area on the right. You might get a message about whether you want your HEIC files to be replaced by your JPG or kept alongside them. Make a choice to proceed

4. If it isn’t done already, set the new image format as JPG under Change Type of Images

5. Now it’s time to export your script. Go to File > Export. Give your script a name, such as ‘HEIC to JPG conversion’, and click Save. For the sake of convenience, we suggest saving it to your desktop
6. Find your HEIC to JPG script and double-click it. You’ll be asked whether you want to install it. Click Install, and then Done

7. From now on, you can convert HEIC images to JPG right from Finder. Select some HEIC files, right-click them, and from the context menu choose Quick Actions or Services. You should see your HEIC conversion script listed
8. Select it, and It will automatically run through the steps you defined and convert your images. You can do this with single images, or you can even batch convert HEIC to JPG if you want
Conclusion
There are times when it is almost impossible to sit behind the screen and convert HEIC files to JPG on Mac. However, the process may appear somewhat complex due to the very nature of both file formats