
How to Edit on Tiktok – You already know about TikTok, the super-popular social media platform that lets you create and share short videos, maybe with a little song and dance, and lip-syncing.
How do they create those fun videos? While TikTok’s built-in video editing tools are quite robust, sometimes to make your videos really pop, you need something more.
Never fear. In this article, we’re going to show you how to use TikTok’s built-in video editing tools, but we’re not going to stop there. You’ll also find our picks for the best TikTok video editing apps so you can choose the apps you need to ramp up your production value.
Ready to create better TikTok posts? Let’s get started with a look at TikTok’s own video editing tools.
Table of Contents
Adjust the camera settings
Tap the plus button at the bottom of the TikTok home screen when you open the app, which brings you to the camera. In the camera, there are several settings you can adjust before you start shooting.
If you know what music you want to use, then tap the sounds icon at the top of the screen, and either search for the music here, or use a featured sound that is advertised as popular on TikTok at the moment. But if you want to record your video first, music can always be added in later.
The TikTok camera also includes a beauty mode feature, which softens your face to make you look more photogenic. There are also several colour adjustment filters that can be chosen from, which you can change depending on what type of scene you are filming. The G6 filter is flattering on faces, and B5 tends to be good for landscapes. These include a slider which lets you adjust how strongly the filter will be applied to the video.
Add effects
There are several different effects available to use on the TikTok camera, which include using a background of your choice from your camera roll, or even making several clones of you to dance next to you. Usually, specific effects are trending, but you can also save effects to use later without having to search through them all again.
Record your video
Now you can start recording your clips! You can choose to shoot either a 15 second or 60 second video, so that the camera will automatically stop recording after this time. There is also a timer which can be set to start recording after three or ten seconds. Tapping on the record button will let it film video normally until it reaches the end of the 15 or 60 seconds, but holding down on it will allow you to also zoom in and out as the video is recorded, by sliding your finger up or down the screen.
When you have finished recording one section, either take your finger off the screen or tap the record button to stop it, and then repeat until you have finished recording all the sections of your video. If you mess up a section, then don’t panic – just hit the delete button and it will get rid of the last recording.
Adjust your clips
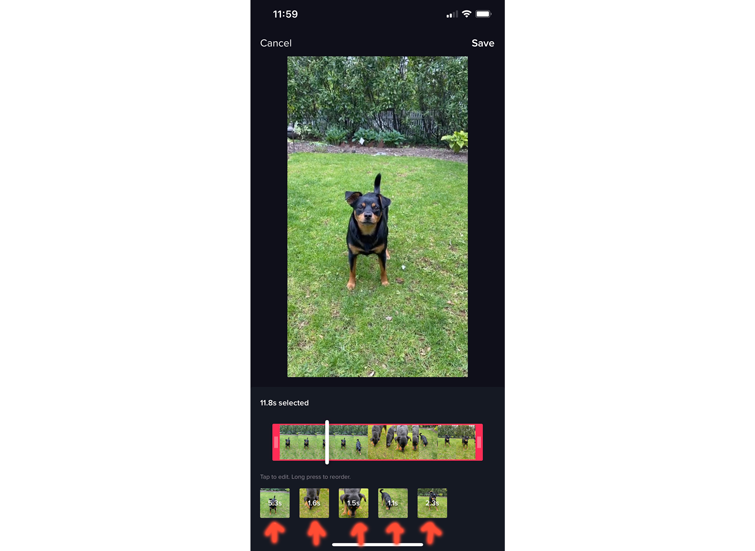
Once you have recorded all your video, tap the tick next to the record button. This will take you to the initial editing screen, where the whole thing will be played through on a loop. This is where text can be added and clips can be adjusted. Start by tapping on the adjust clips button in the top right hand corner. Here, you can select each of your clips and adjust their lengths individually. Clips can also be rerecorded by tapping on start over when the video is selected. Once you have finished here, click save.
Edit the sound
If you didn’t add music before recording, now is your chance. Just tap on sounds in the bottom left hand corner, and search for the sound you want to use or find one in recommended. You can choose from several different choices of sections of each song, ranging from 15 to 60 second sections. You can also favourite a sound so that it is easy to find for next time under your favourites button next to the discover button on the sounds window.
Next you can adjust the volume of your originally recorded clips in comparison to the sound you added from TikTok. To do this, just tap on volume, and to record a voice over over your video, go to the microphone icon on the right hand side of the screen. If you want to edit the sound of your voice, just tap on voice effects to choose from a selection of different atmospheres.
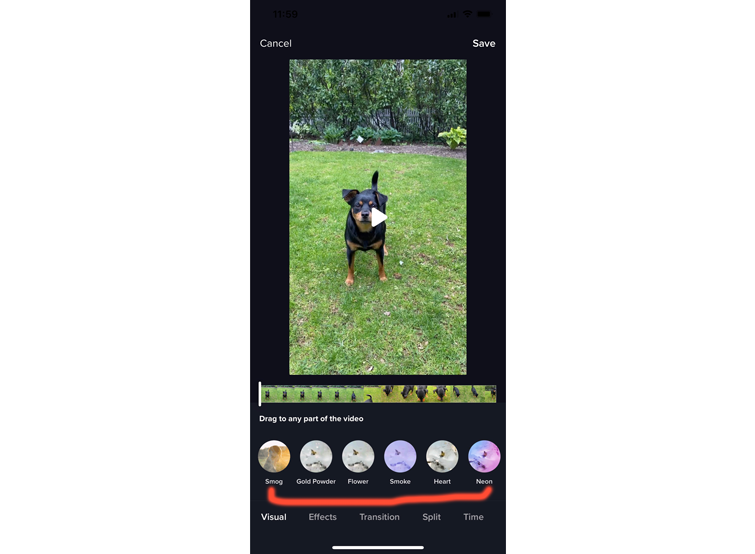
Add a post-shooting effect
The same filters can be added in the top right of the screen if you didn’t add them before recording, and the effects button allows you to add different looks over the top of your video, such as with the popular rainbow strobe effect, which creates the look of multicoloured flashing lights. You can also add backgrounds – see our guide to how to use green screen on TikTok.
Choose the effects you wish to use, play the video, and simply hold down on the effect in the part of the video you want it to be applied to. You can carry on adding more effects to different parts of the video as well, until you are happy with what you have created.
Add transitions
Clicking on transitions lets you choose from an array of stylish ways to smoothly transition from one clip to another in your video, for the duration you hold down the transition for as you apply it to the video.
Any effects applied can be erased with the undo button underneath the timeline, allowing you to start added them in again. Any section of your video can be put into slow motion, reverse speed, or on repeat in the time section of the effects window, and the split section allows different options of duplicating a part of your video into any number of squares or effects. Save at the top when you are finished with the effects window.
Add stickers
The stickers icon at the bottom of the editing window has a large array of graphics and emojis to add to your video for you to browse. This includes options such as a time, trending stickers, the ability to include a poll in your video, and all of the emojis included in your keyboard.
Also in ‘stickers’, you can manually apply a face zoom, and zoom in on a face in any part of the video.
Post your video on TikTok
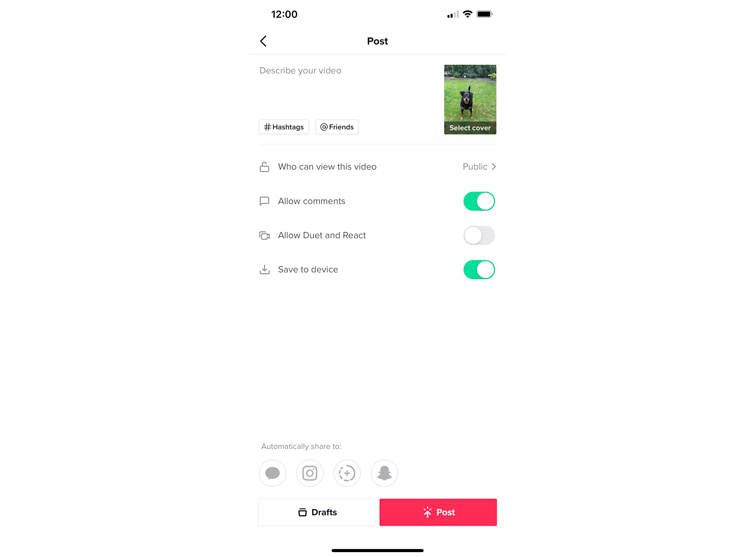
Once you are happy with your editing, tap the red next button, which will take you to the posting screen. You will see a thumbnail of your video in the top right corner – tapping on this will show you the finished video on a loop, and tapping on select cover will allow you to select the 2-3 second portion of your video that will be shown as a preview on your profile. Adding in hashtags gives your video the opportunity to be seen by a wider audience, and you can also tag friends in the video – like on Instagram.
TikTok gives your video three options of visibility; public; private (only you can see it and it will not appear on your profile); or friends (comes up on your profile for people you follow who follow you back). The allow duet option means that other TikTokkers can react to or interact with your video by recording a video next to yours on their screen, and then post this on their profile.
The allow stitch option is a new feature which also allows other TikTokkers to interact with or react to your video, but your video appears as the first section of their video, which they can cut at any moment, instead of simultaneously running next to theirs, as with the duet option.
Once you are satisfied with all your posting settings, go ahead and click post! Videos usually take one to three minutes to upload, at which point they can come up on anyone’s ForYou page, and will come up on your followers Following page. Congratulations – you have created a TikTok video!
7 Basic Editing Tips for Creating TikTok Videos
1. Basic Cutting
Similar to Vine back in the day, with TikTok you edit your video while you shoot. You can start and stop recording as you go, and the app automatically adds clips to your timeline as you shoot them.
You can hit the red Record button once and let it roll, or hold and release to record a specific length. Once you’ve recorded all your clips, you can still go in and edit them further. Here’s Rachel Pederson going over all the basic functions of TikTok and explaining what to do once you’ve recorded a video.
To start editing your footage, go to Adjust Clips on the right side of your screen, and pick the clips you want to tweak. Each clip has a little number over it that reveals its length, and you can move them around on your timeline as you see fit. Just hold down on the clip you want to move, drag it to the right spot, and hit Save. Now it’s time to start adding Sounds, Effects, and Titles!
2. Audio
Right off the bat, look at the top of your screen for Sounds, and tap it to look through the music. Once you’ve picked a song, you can choose where you want it to start and play it as you record to better sync your shots with it. Additionally, you can add a voice-over and sound effects. (We’ll take a closer look at sound effects in a moment.)
Currently, you can only add one song per video inside the app. Of course, you can always edit in another apps, add whatever you want, and then upload to TikTok.
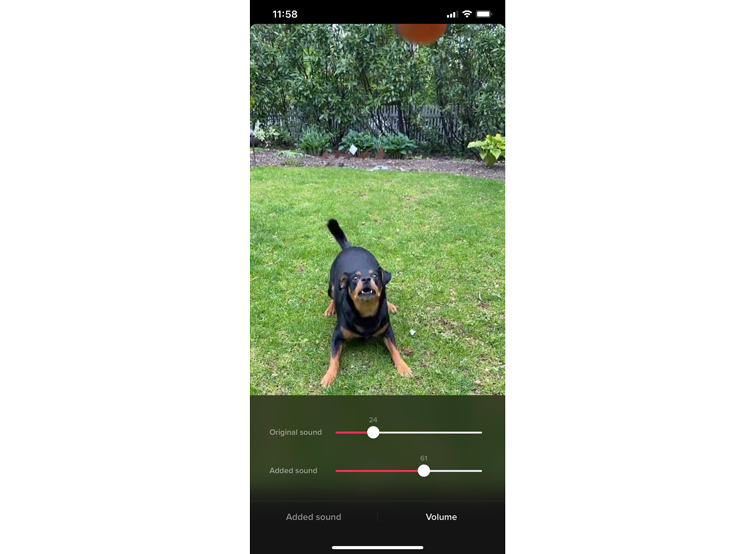
With all of this audio stuff in mind, I feel like one of the handiest features of TikTok is how it lets you work with multiple audio layers in a video. For instance, you have your recorded clip with in-camera audio, your music, your sound effects, and anything else you’ve added. TikTok lets you lower the volume of the camera’s audio while raising the music (and vise versa).
To do this, just hit the arrow on the side to bring up more options and choose Volume. You’ll see two sliders, one labeled Original sound and one labeled Added sound. Added sound refers to the music you chose. Original sound refers to in-camera audio and voice-overs.
3. Sound Effects
Under Sounds, you can search for sound effects or add one of your own. To search for sound effects in the Sounds library, just enter a descriptive word (boom, bang, splat, for instance), plus the words “sound effect.”
To add your own recorded sound effect, simply hit Voice-Over on the right side of the screen. Like with other audio that you add, you can edit your sound clip audio to start whenever you need it to and play with the volume.
4. Using Transitions
Once you’ve recorded or uploaded the clips you want to use, go down to Effects, look toward the bottom, and choose Transition. Find the ones you like, and figure out how you want to use them. To place a transition, just tap on your timeline — the effect will be added to that spot.
The app’s transitions are perfect for transformations and reveals. Just make sure you replay the clip over and over to ensure you’re getting the desired result, and tweak accordingly.
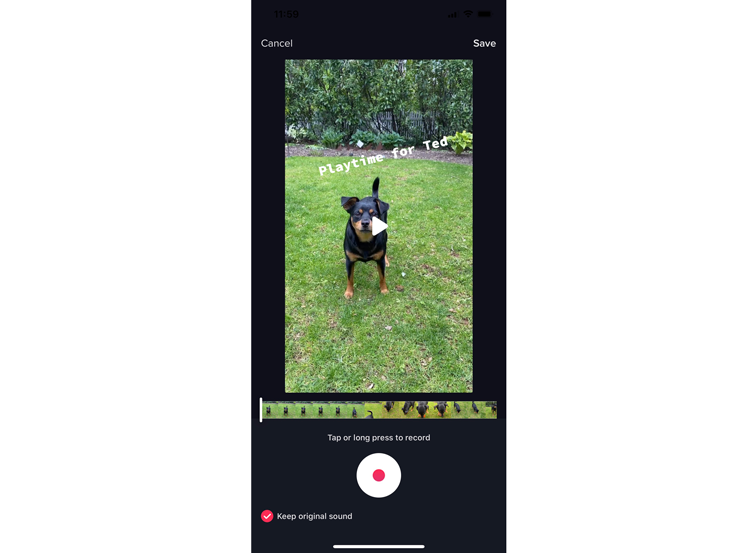
5. Working with Text
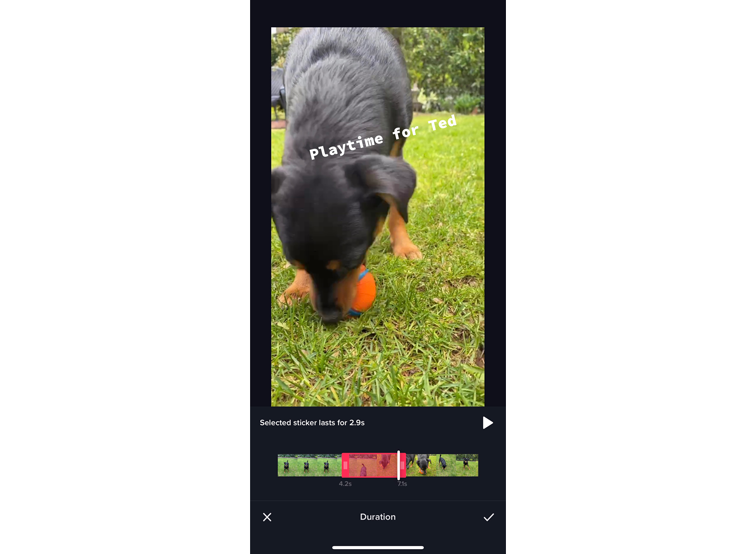
To add text or a title to your video, hit Text at the bottom. You’ll have the option to choose the font, color, and size of your words. If you’re familiar with Instagram’s fonts, TikTok’s will feel familiar. Once you’ve entered your words, you can choose where they appear and how long they appear on screen. To do this, tap the title once. A box-outline will pop up around the text and offer two options: Set Duration and Edit.
Choosing Set Duration allows you to pick time and length, as mentioned before. Tapping Edit returns you to the screen where you chose your font, color, and size.
6. Effects
Effects are where TikTok really shines. There are two ways to approach applying them — before and after you record. Once you have your video recorded, you can speed it up, reverse it, and add filters, including interactive AR filters like you see on Instagram and Snapchat.
To apply an effect while you record, tap the Wink face icon next to the red Record button. This brings up a ton of different effects to choose from. As of right now, you can only apply one effect at a time. Which is to say, while you can add multiple effects throughout your video, you can’t stack two effects on top of each other. One effect must end before you can add another one.
Here are a few other effects you can choose and a brief look at what they do:
- Speed: Choose the Speed option on the far right side of the screen while you record. You can record in slo-mo (0.3x, 0.5x) or speed things up (2x, 3x).
- Beauty: Choose Beauty on the far right side of the screen while you record. This provides a small amount of face smoothing, adding a slightly polished look to the person featured in the video.
- Filters: Choose Filters on the far right side of the screen to apply preset looks to your shot. There are lots to choose from, so be sure to poke around before you settle on one.
7. Export/Publish
Once you’ve finished your video and locked down the audio, effects, and text, it’s time to publish! Just like with Instagram, you have the option to add hashtags and tag friends and other accounts in the description box.
You can send the video to Public, Private, or only your Followers, as well as disable comments. You also have the option to allow people to use this video for reactions and Duets, meaning they can play off of your content in fun ways, usually with the hopes of going viral. It’s a good way to get your video seen by others.
Conclusion
Editing is a great way to sharpen footage to improve the quality or create something that would be impossible with just one take. Perhaps you want a video where you are having a conversation with yourself. Through editing, this is possible.