
Have you ever wanted to create folders in Gmail? If yes, then I guess you already know that Google still doesn’t offer this functionality. However, if you’re one of those people that insists on creating folders in Gmail, I got some good news for you – actually something better than good news. Now, thanks to a web app created by Max Ogden (that extra creative guy), you can finally create folders in your Gmail account!
Table of Contents
How to Create Folders in Gmail in 30 Seconds
First thing’s first: In Gmail, folders are referred to as labels.
Now, this part’s easy. Like, really easy.
To create a label, all you have to do is go to the left side of your inbox and click More. From there, you’ll see the option Create new label. In the pop-up window, name your label:
Just like that.
Note: You’ll also notice the option to Nest label under — where you can create new subfolders.
Let’s say, for example, you have a main folder for Google Alerts and you’d like to organize alert emails by month. You could create a label “Google Alerts” and then subfolders like “January” and “February” to nest each month underneath.
Another way to create labels is by going through Settings:
- Click the Settings icon.
- Go to the Labels tab.
- At the bottom, click Create New Label.
- Name the label.
- Click Save.
How to Quickly Add a Label to a Message Sent To You
Now let’s go over how to create folders in Gmail for messages already in your inbox:
- Open the message.
- Click the Label button (It has a tag icon).
- Check off each label to want to add, or type a new label.
Pro tip: Add labels to multiple messages by selecting the emails from your inbox view and then clicking the Label button.
Want your templated emails to be even more effective? Email tracking will notify you when a recipient reads your emails, clicks a link, and views attachments.
How to Automatically Label an Email Based on Search Criteria
This part’s awesome.
If you want to know how to create folders in Gmail but don’t want to do the work each time, this is for you.
Click the down caret in the Google search bar, you can create automatic labels based on criteria.
Once you determine your criteria, click Create filter with this search (bottom right corner) then apply the label by clicking the Choose label drop-down:
How to Turn a Nest Label Into a Parent Label
- In Settings, click Edit in the actions column (for the label you want to move).
- Make sure Nest label under is not checked.
- Click Save.
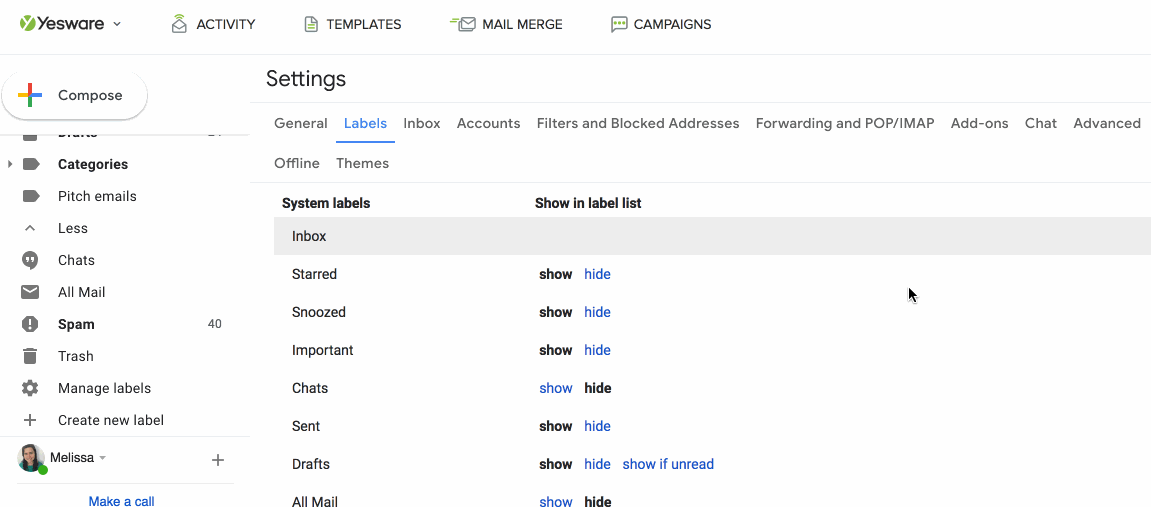
How to Manage Your Gmail Labels With Ease
Once you create labels, you may need to tweak them.
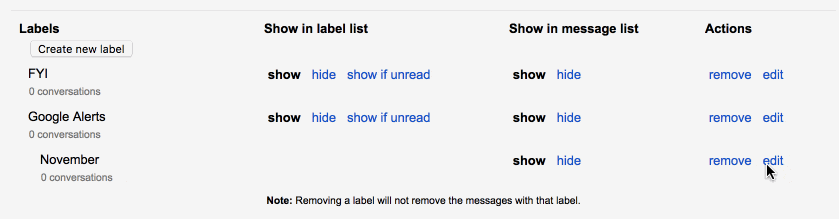
Whether you need to rename a label, hide one that you don’t want to delete, or remove a label altogether, there’s a simple solution for that within the Labels tab of Settings.
You can get there by either clicking More on the left-side of your inbox (then Manage Labels), or through Setting then Labels (as mentioned in previous step).
From this screen, you’ll see your labels (and sub-labels) listed with the option to show or hide them in the label list or message list.
From here, you can also remove or edit your labels:
How to Add a Label to a Message You’re Sending
This trick comes in handy when you’re sending outgoing messages that you want to be labeled:
- Click Compose.
- In the bottom right corner, click More options.
- Click Label.
- Choose a label to add.
How to Create Folders For Future Emails
What if I told you that you could set up folders for future emails that would save you time writing and searching for old emails?
That’s why we created a tool that does it for you. It’s called Templates, and it appears as a button in your inbox.
The end picture: Your future emails are already written for you — they wait for you to add custom info and press “send.”
Here are some benefits of having a template library:
- Quick, easy organization: Categorize your messaging (cold emails, follow-up, break up etc.) for fast reference.
- Pre-filled messaging: The information you keep typing is already there for you, with placeholders for the info that changes. What it means for you? Less mistakes, more time saved. It’s a win-win.
How to Move Emails into Folders on the Gmail Web App
Moving your important emails into Gmail folders is much easier than creating new folders.
Here’s how to do it on Gmail’s desktop version:
Step 1
To move a single email, click and hold to drag the message and drop it in the desired label on the left sidebar.
Step 2
If you’d like to move multiple emails at a time, check the boxes on the left of the emails you want to move.

Then, click and hold to drag them over to the required folder on the left sidebar.
Step 3
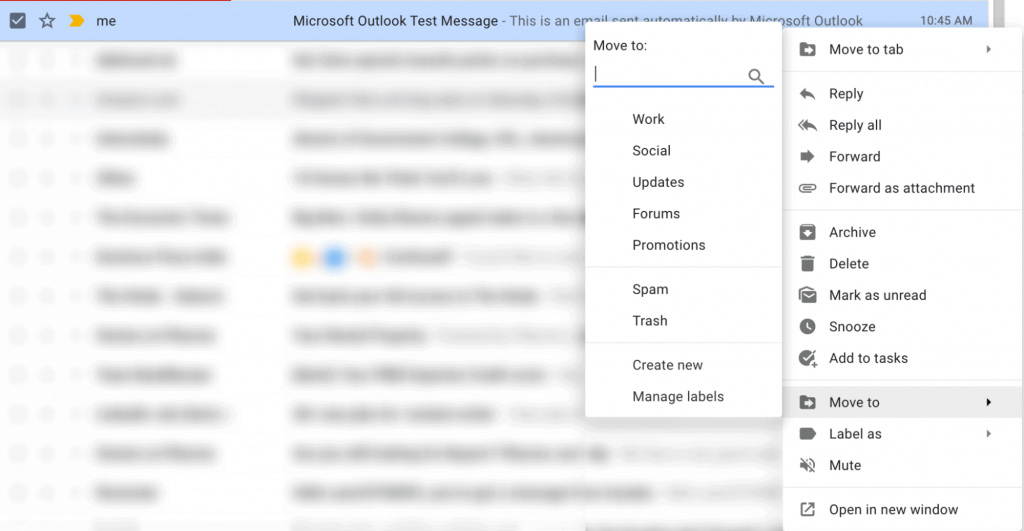
Alternatively, you can right-click the message you want to move, click the Move to option, and select your desired folder from the list.
How to Assign Emails to a Folder Automatically on the Gmail Web App
Gmail also lets you avoid the hassle of manually assigning emails to folders.
All you have to do is create automatic email filters!
Here’s how it works:
Step 1
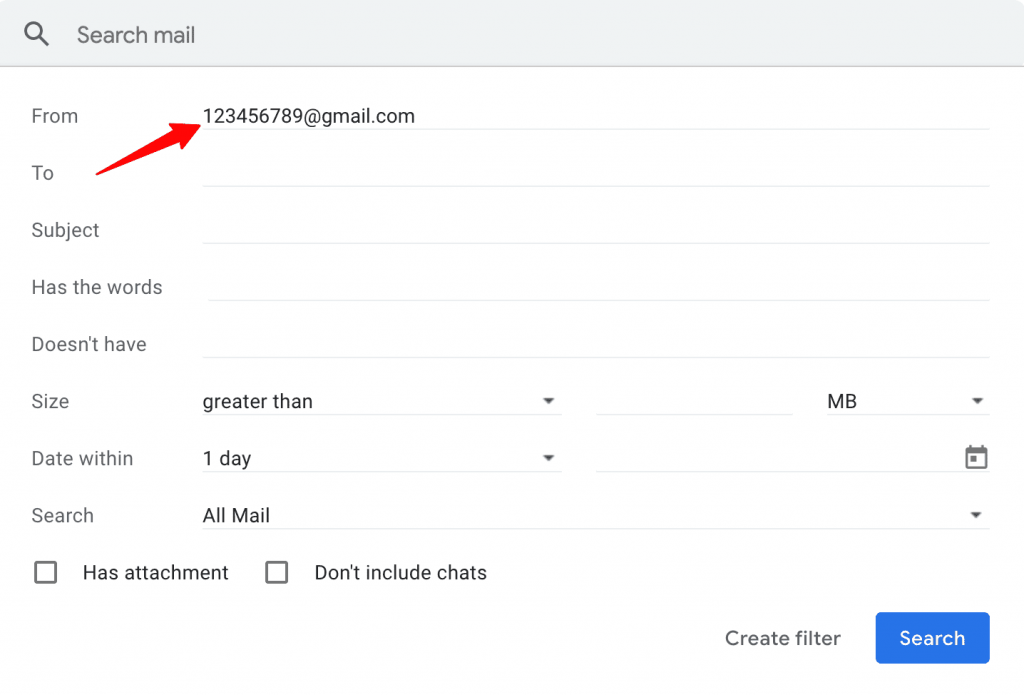
Once you open Gmail, click the Show more options icon in the search bar at the top of the screen.

Step 2
If you want future emails from a specific email address redirected automatically to a chosen folder, enter that email address in the From field of the drop-down menu that appears.
This way, all future emails from this email address will automatically go to the folder you assign.
Note: You can also fill in other filter criteria to create a more restrictive filter.
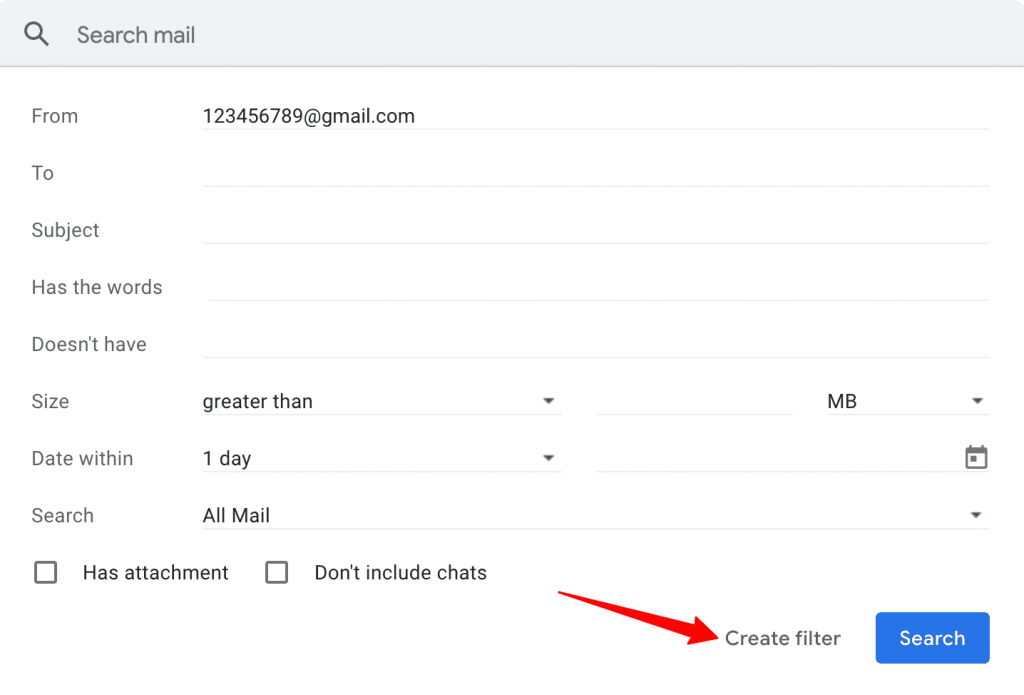
Step 3
Click the Create filter button when you’re done.
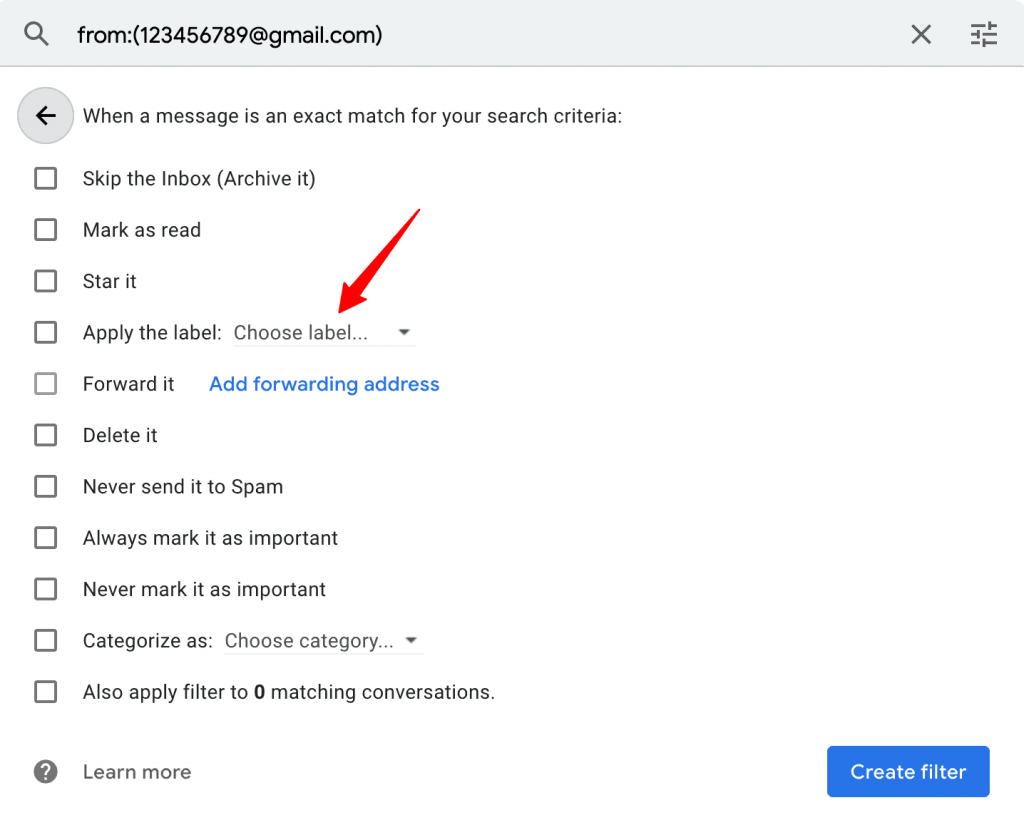
Step 4
From the new window that appears, select the Apply the label to add a label to these emails. Then, choose which label to apply.
Step 5
Finally, click the Create filter button.
Gmail will now send all incoming emails from that email address to the specific folder you have chosen.
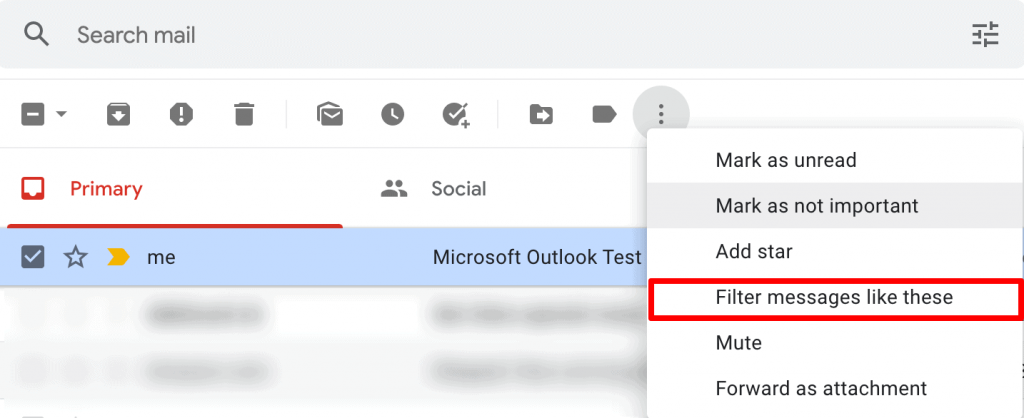
Alternatively, open the specific emails to which you want to apply a filter, and click the three vertical dots next to the label icon (folder icon).
From the drop-down menu that appears, select Filter messages like these and follow the steps outlined above.
How to Nest Folders on the Gmail Web App
Nesting folders in Gmail is very similar to creating subfolders inside a parent folder.
i. Method 1: Create a New Nested Folder in an Existing folder
Here’s how to create a new nested label inside an existing label:
Step 1
Open your Gmail inbox. Then, navigate to the label list on the left-hand side of the screen, and find the label you want to make the parent label.
Step 2
Hover your mouse over the folder and click on the three vertical dots that appear. Then, from the list of options available, pick Add sublabel.
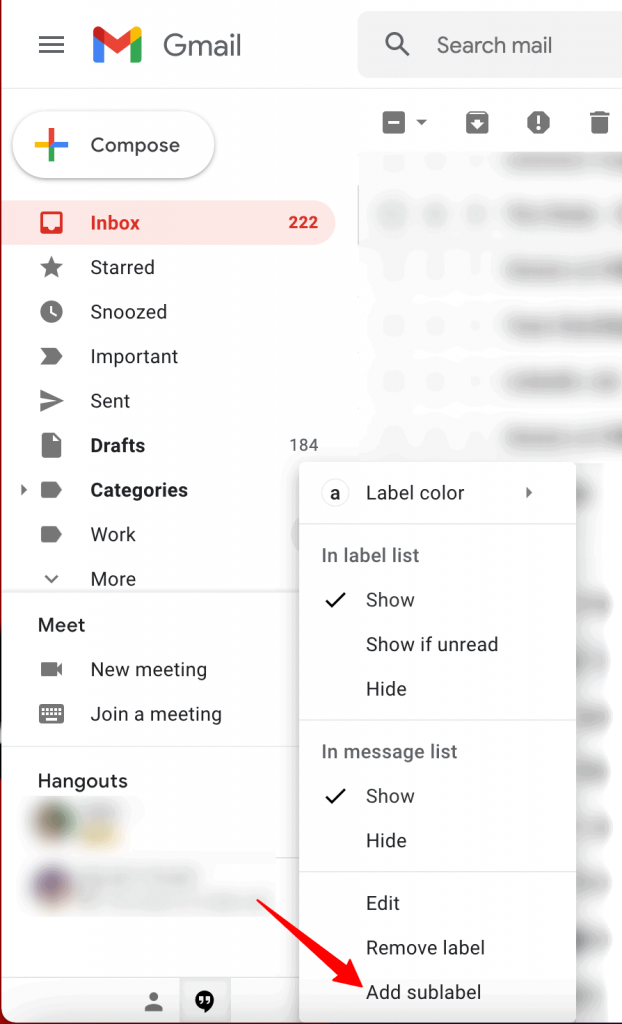
Step 3
Then, give it a name and hit Create.

ii. Method 2: Turn an Existing Folder into a Subfolder
Follow the steps below to take an existing label or folder and turn it into a subfolder:
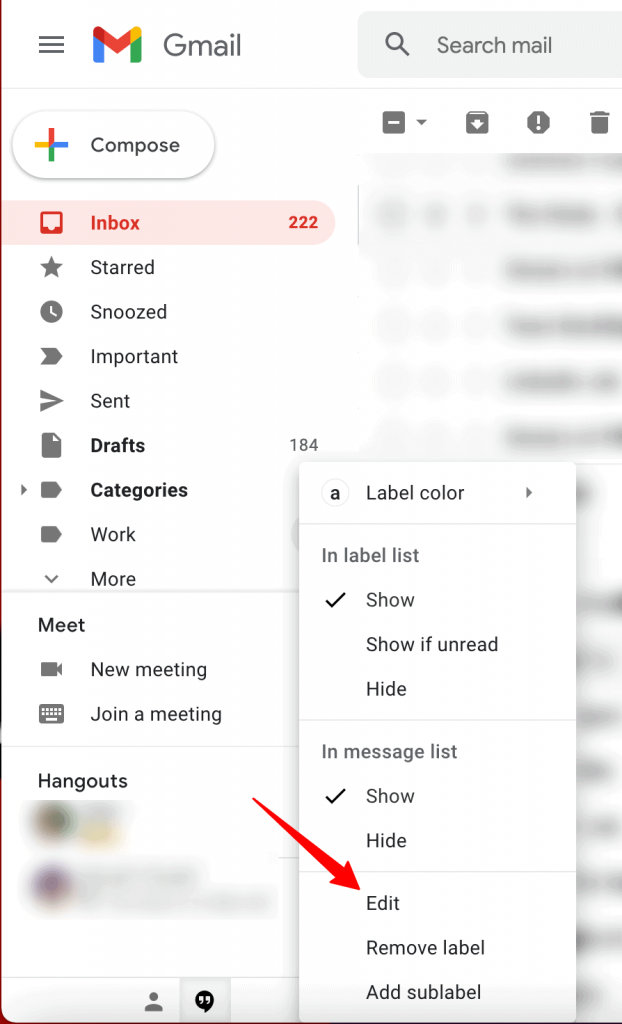
Step 1
Hover your mouse cursor over the desired folder to reveal the three vertical dots.
Then, click Edit from the drop-down menu.
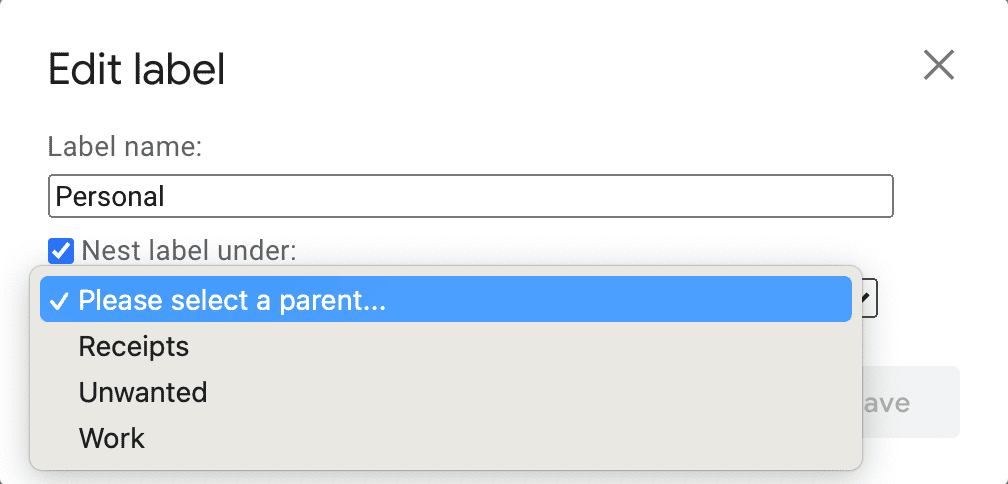
Step 2
All that’s left is to choose which folder it should be nested under — click your choice.
Besides creating, moving, and nesting folders, you might often need to rename folders. I’ll share the steps to do so in Gmail.
Conclusion
There are so many reasons why people love using Gmail. It’s free, provides a solid quota of space for your email inbox, and makes it super easy to archive your messages or delete them without a second thought. If you have a Gmail account, chances are you’re probably storing all of the most important things in your Gmail inbox instead of a folder with a name that says “Important Stuff”. But if you can use folders on Gmail, you can organize your important email more effectively.