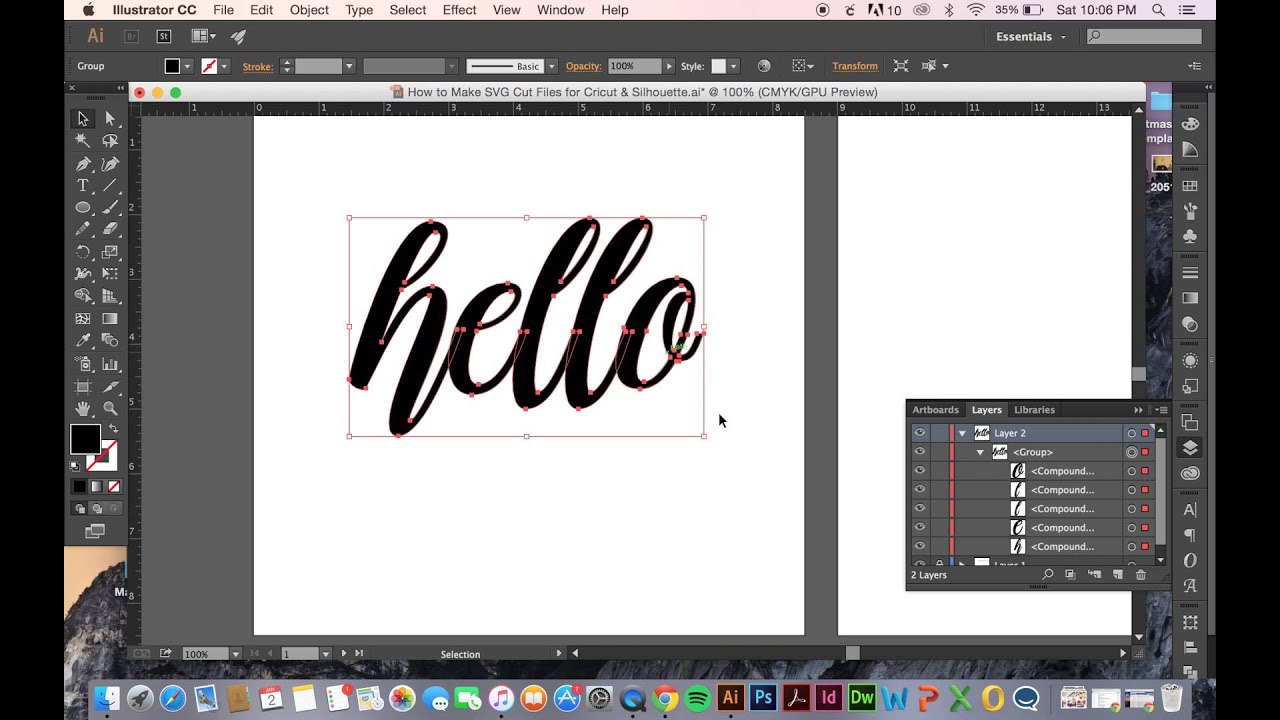
How to Create SVG Files – When I was first introduced to SVG files, it blew my mind. I knew about vector graphics with Adobe Illustrator, but this? This was different. The ability to create extremely high-quality graphics in SVG format with your cricut machine was easy. It came down to just cutting the image, importing it into an SVG file, and pasting it into my design.
Since then, I’ve learned even more mighty ways of creating SVG files with the help of plugins that have made the process way easier. If you are interested in learning more about creating SVG files with your cricut maker I highly recommend checking out these resources webmasters studio will send you actionable data so you know what’s working let webmasters studio tell you what is
Table of Contents
WHAT IS AN SVG FILE?
Notice how when you zoom into a picture, it turns blurry after a certain point?
This happens because image formats like JPEG or PNG are raster-based, which means they are composed of a fixed number of pixels that come together to form an image.
Based on the number of pixels per inch an image is made up of, which is also known as its resolution, its clarity varies.
Contrast this to an SVG file, a vector file format that helps scale graphics without losing quality.
This is because SVG, which is short for Scalable Vector Graphics, store image information in code.
SVG files have many applications, but we will be concentrating on creating them and making sure that they work seamlessly with cutting machines.
When you import the SVG file to the cutting machine software like Cricut Design Space or Silhouette, the information in the SVG file is read and executed by your machine to cut the design.
BEST SOFTWARE TO CREATE SVG FILES
There are several paid and free software options when it comes to creating SVG files –
After years of designing and selling SVG files and trying out different programs, my favorite is Adobe Illustrator.
I have a subscription to Adobe Creative Cloud, and it is hands down the most important business investment I ever made.
The ability to create files that work well with cutting machines is unbeatable in Adobe Illustrator.
If you are serious about building a thriving SVG business, starting with the right tools is the first step. You can sign-up for the free 7-day Adobe Illustrator trial to start creating SVG files.Try Adobe Illustrator
If possible, use a laptop that can run Illustrator without getting stuck every other minute. The minimum configuration I recommend is at least 8GB RAM and an i5 processor. I started with an old and cranky laptop, and it wasted so much time which could have been spent on designing.
Once your business starts growing, consider investing in an ergonomic chair to support the long hours and a good quality display monitor to see your designs on a bigger screen.
BEST FONTS TO MAKE SVG FILES
There are specific requirements a font needs to meet for it to be suitable to make SVG files.
Choosing the best fonts is an important step in making and selling SVG files. They don’t just determine your designing style but also determine the quality of the cut your customer will achieve.
Choosing a font that is not smooth or has unnecessary twists and turns, or is too complicated or too thin to cut can result in a bad experience for a customer and a negative review of your product.
When you look at some fonts, you know straight away that they are not right for cutting. Like the one below –
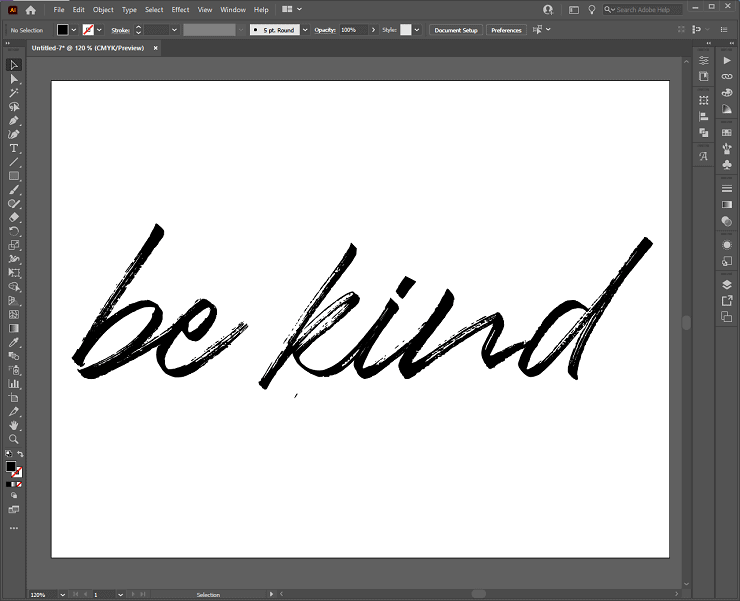
The font above is beautiful but not suitable for cutting. It is not smooth and will be hard for the machine to cut.
Also, a font may look smooth on the surface but still have issues. The best way to determine this is by installing the font and testing it out in Illustrator.
Pick a font that has a smooth path and the least number of “anchor points.” You can do this by installing the font, writing text using it in Adobe Illustrator. When you create outlines for the text, you will see the points and paths that make up the words.
Since it is impossible to purchase every font and test if it works for cutting, I put together a list of fonts that I have already tested and used to make SVG files.
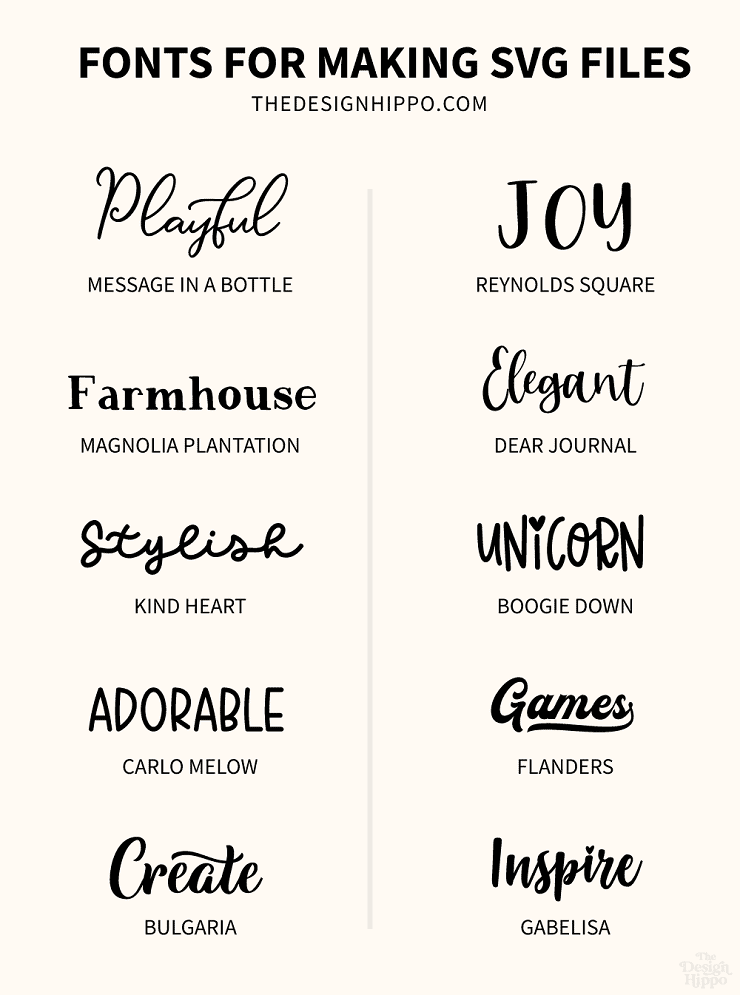
- Message in a bottle
- Reynolds Square
- Magnolia Plantation
- Dear Journal
- Kind Heart
- Boogie Down
- Carlo Melow
- Flanders Script
- Bulgaria Script
- Gabelisa
When you are starting, it’s necessary to play with different fonts to determine your design style. You will also need design resources to create branding for your online store and social media like Facebook and Pinterest.
You can purchase these resources as needed, or an excellent option to consider is the Creative Fabrica subscription. With the monthly subscription, you can access thousands of fonts, graphics, and mock-ups.
Using Convertio JPG to SVG Converter
- Open your Web browser and go to https://convertio.co/jpg-svg/. This takes you to the page for Convertio’s JPG to SVG Converter, which is free to use.
- Select the source for your JPG image. At the top of the converter menu, you should see a red toolbar listing different sources you can access to upload a JPG image file to be converted to SVG.
- Navigate to the file you want to convert. Once you’ve selected a source, a dialog box should pop up with the library of your computer’s folders. From there, navigate to the folder with the file you want to convert and select the file.
- Click Convert. Once the file has been uploaded, a red button will appear in the lower-right corner of the menu screen. This will start the conversion process, which may take a few minutes depending on the file size.
- Click Download. Once the file is done being converted, a blue button will appear to the right of the file name in the Converter menu. Once you click it, the image will then be downloaded onto your computer as an SVG file.
HOW TO MAKE AN SVG FILE IN ADOBE ILLUSTRATOR?
1. Create a new document
Go to File > New…
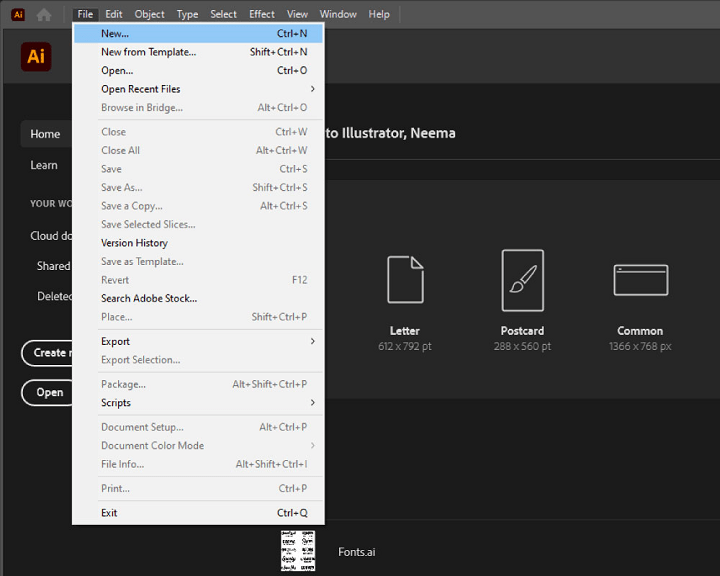
You will see a window pop-up called New Document, where you can define the artboard size.
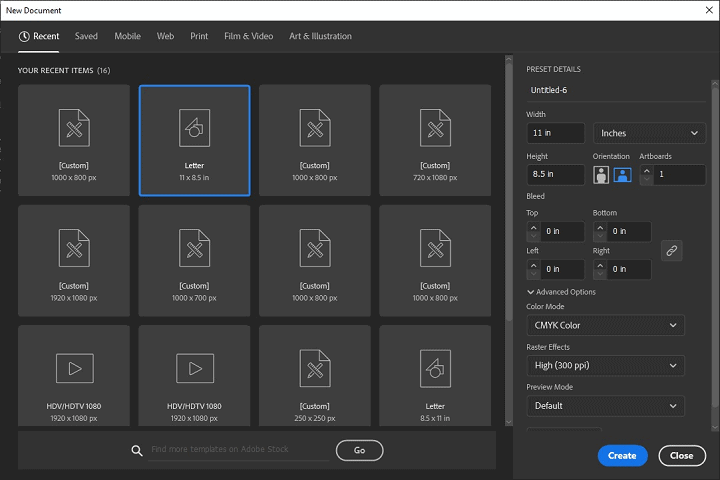
The artboard size you input here will determine the size of the SVG file when finally exported.
For example, if I am making a t-shirt design, I can choose the design width around 11 inches and the height around 8.5 inches. When we export the SVG file and import it to Cricut, the design will retain the same dimensions.
In the window, under the section Preset Details, name your document, then go to Width and choose Inches in the dropdown.
These are the artboard settings I am using for this tutorial –
- Input Width 11 in and Height 8.5 in
- Select Orientation landscape
- Color Mode > CMYK Color
- Raster Effects > High(300 ppi)
Click on Create.
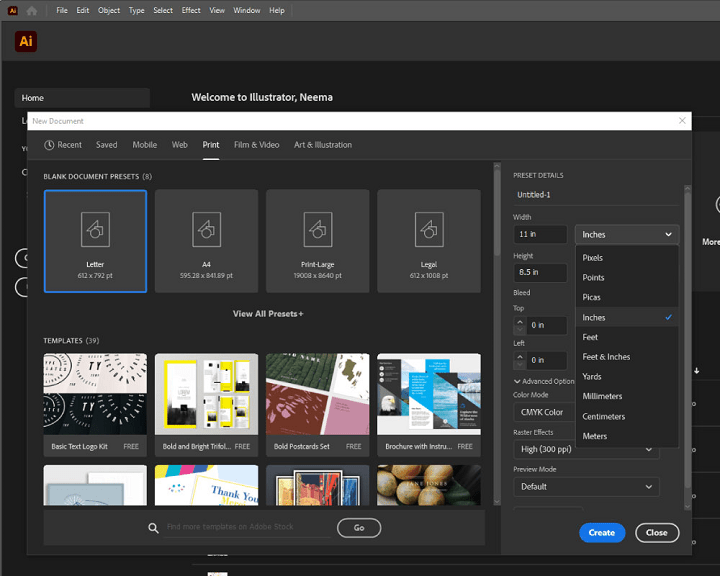
The blank artboard will appear on the screen.
2. Type your text and choose the font you like
Now click on the Type Tool(T).
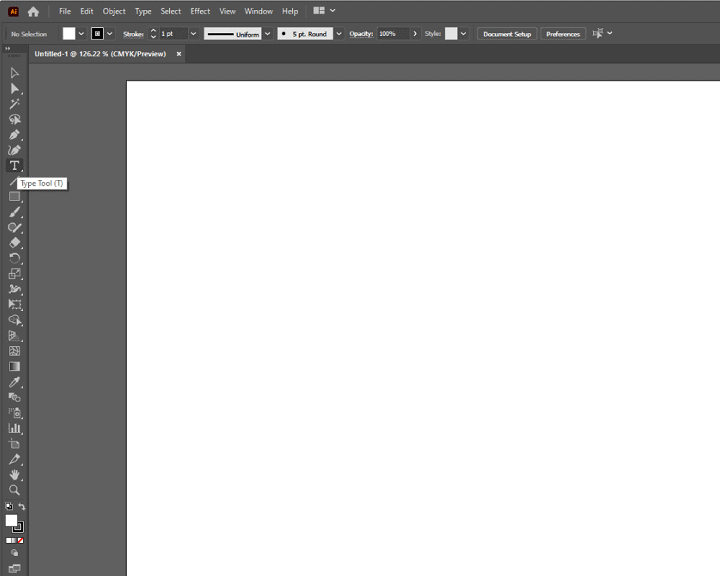
Then place and click it on the artboard. The sample text will appear in the default font.
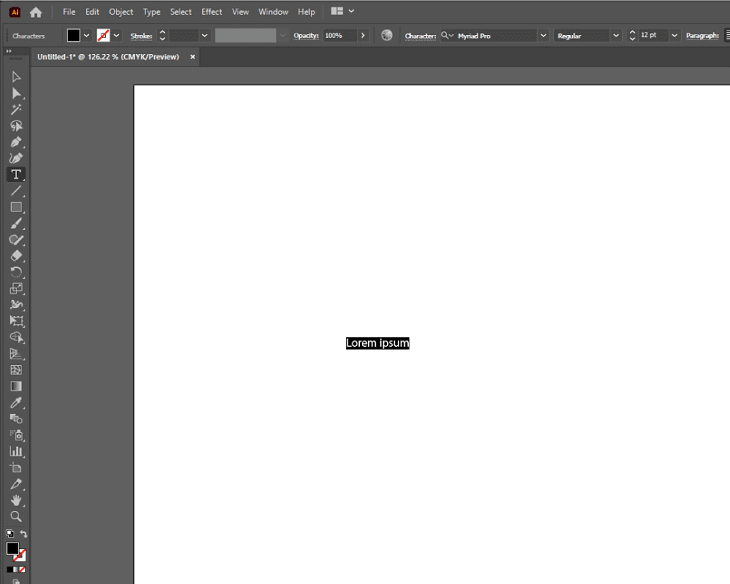
Change the default text with words of your choice to be used in the design.
Now select the font you would like to use for the design. For this, go to the toolbar and locate the Fonts dropdown beside the Character section.
I selected one of my favorite fonts that work well with cutting machines – Auttie Script.
Now it’s time to resize the text. For this, click on the Selection Tool. This will select your text as an object.
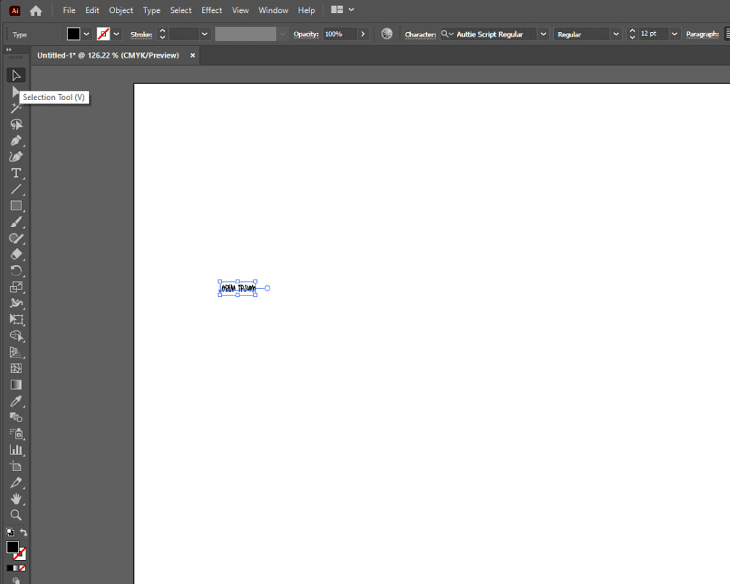
Hold Shift on your keyboard, place your cursor on the box that appears around the text, and expand it. You should be able to see the text in larger font size.
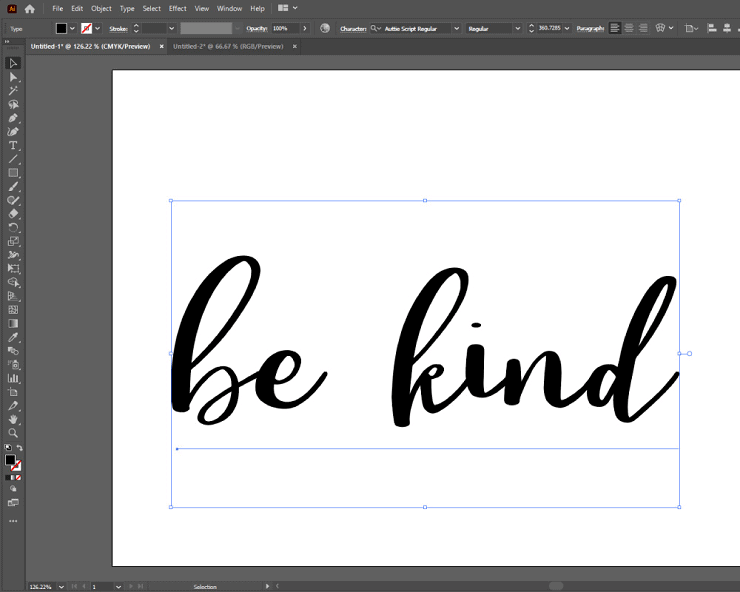
Alternatively, you can go to the Font Size dropdown beside the Fonts section to input the size directly.
3. Convert the text to outlines and weld together
We will now convert the text to outlines. The outlines will help cutting machines get directional and coordinate information from the SVG file.
Right-click on the text box and select Create Outlines.
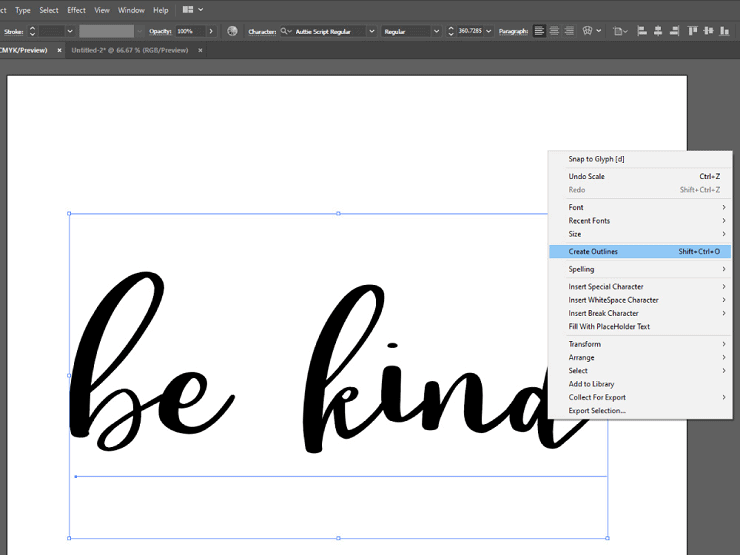
Now that your text has been converted to outlines, we have to weld all the letters together.
Each letter has an outline, but it overlaps with the next letter. This is because we used a script font with connecting letters.
We don’t want the machine to cut the outline of the preceding letter on the next letter.
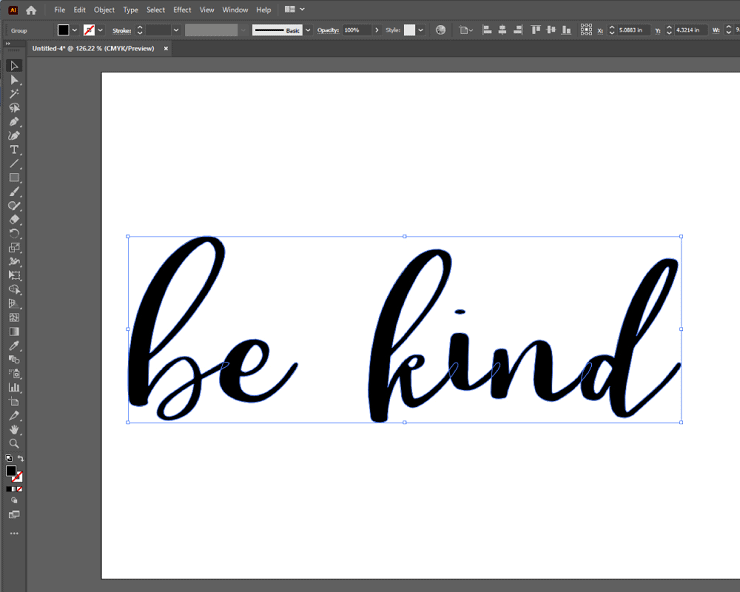
To weld the letters, we will use the Pathfinder tool. Click on Window in your toolbar. Go to Pathfinder.
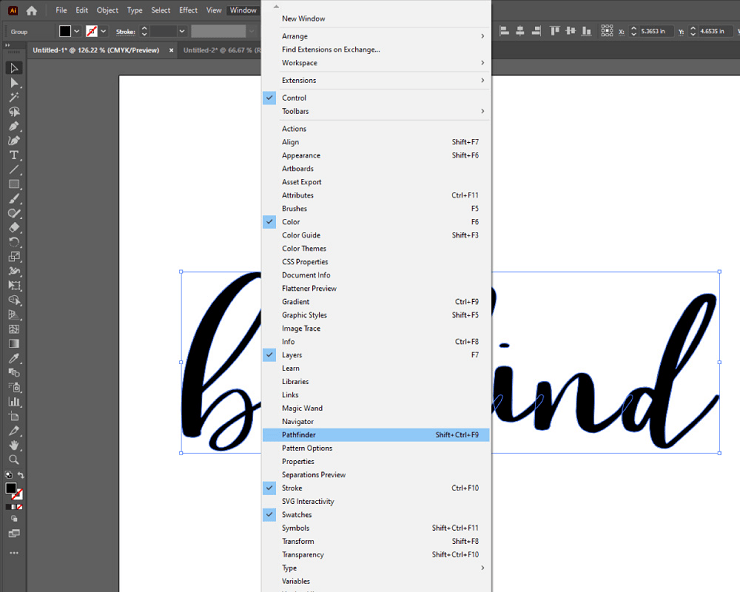
The Pathfinder window will pop up. While having your text selected, go to the Shape Modes section and select Unite.
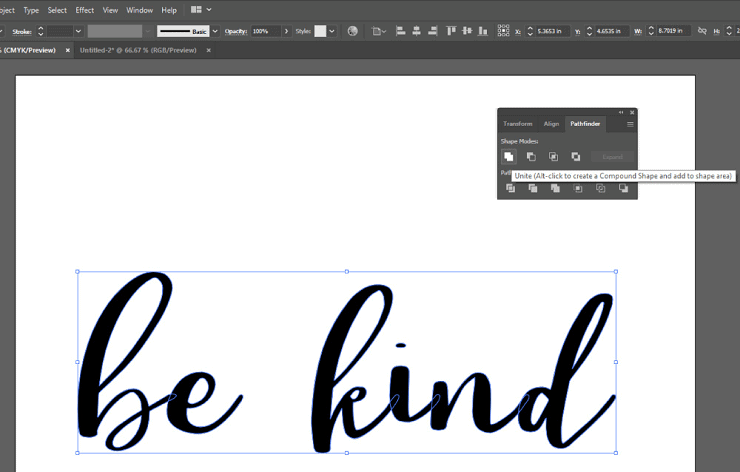
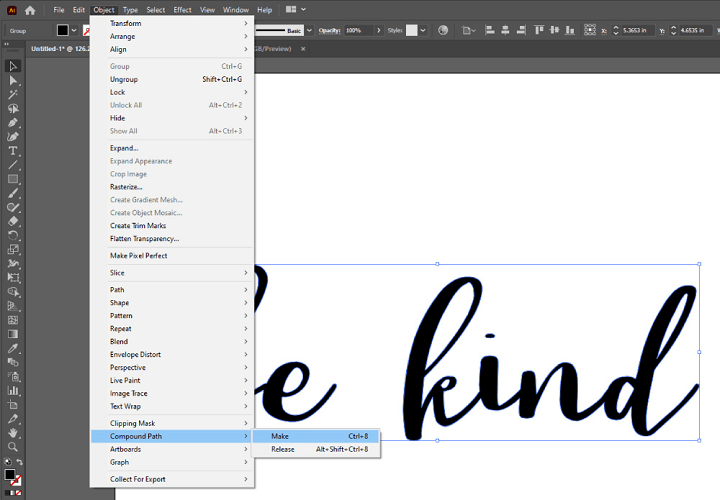
For this simple text design, we want the design to be on a single layer. This will ensure that the design shows up on a single mat in the Cricut Design Space.
Go to Object in the toolbar and select Compound Path > Make.
4. Align your design to artboard and save
Align the design on your artboard by going to Window and selecting Align.
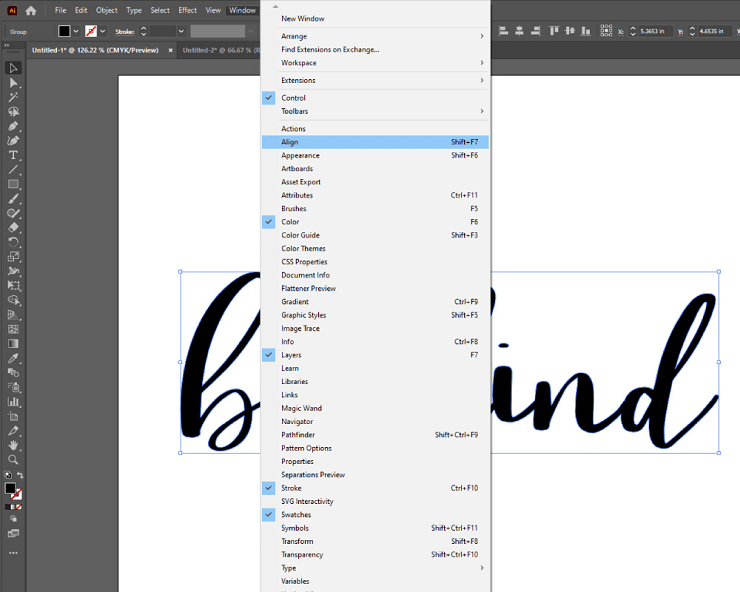
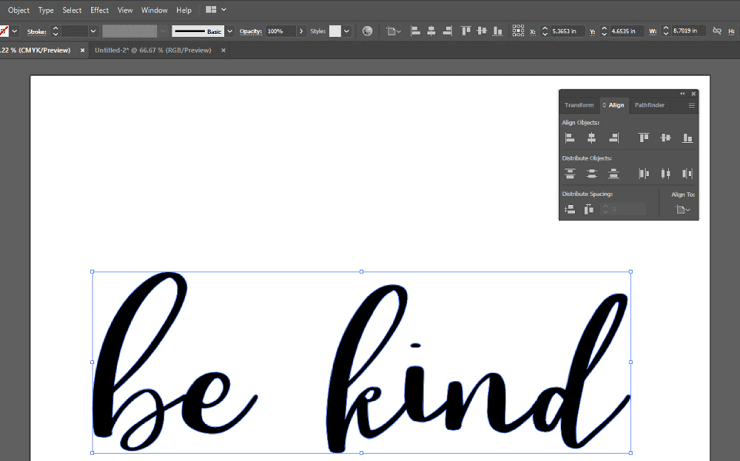
I like to center the design on my artboard vertically and horizontally.
Go to Align To in the Align pop-up window and select Align to Artboard.
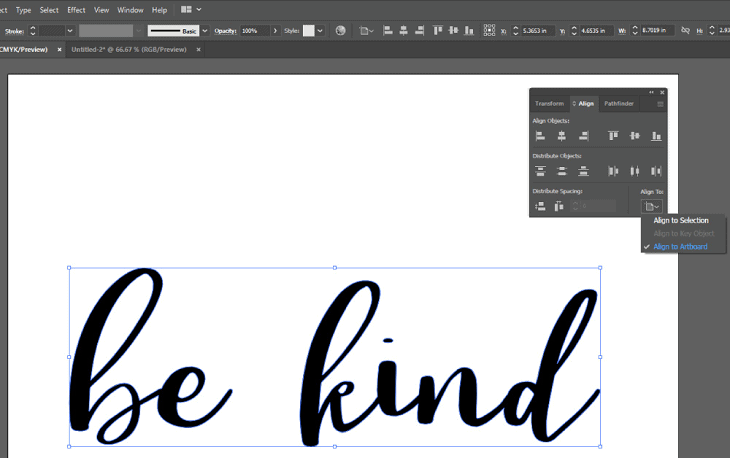
Then go to Align Objects and center the design both horizontally and vertically.
You can choose to resize the design again to fit the artboard properly at this point.
Select your text and expand it by holding ALT + SHIFT and dragging on the box. Holding ALT and SHIFT ensures that the design stays centered on the artboard while being resized.
Save your design work by going to File > Save As… and storing it at your desired location.
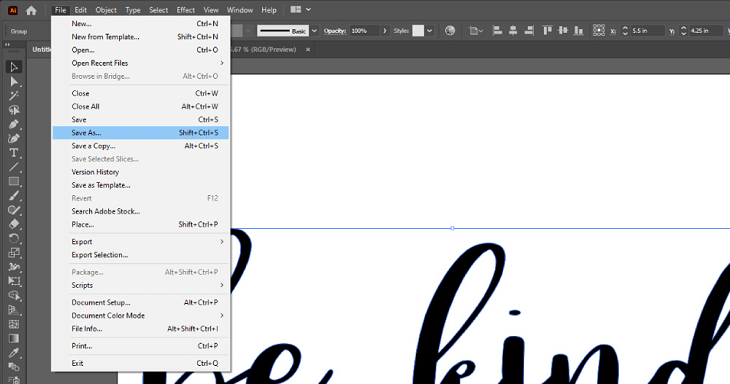
How to export the SVG file from Illustrator?
Go to File > Export > Export As…
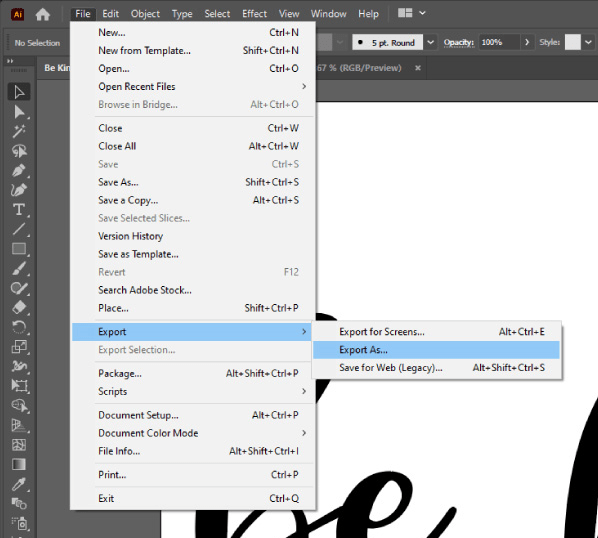
A window will pop up. In the Save as type: section, choose SVG (*.SVG).
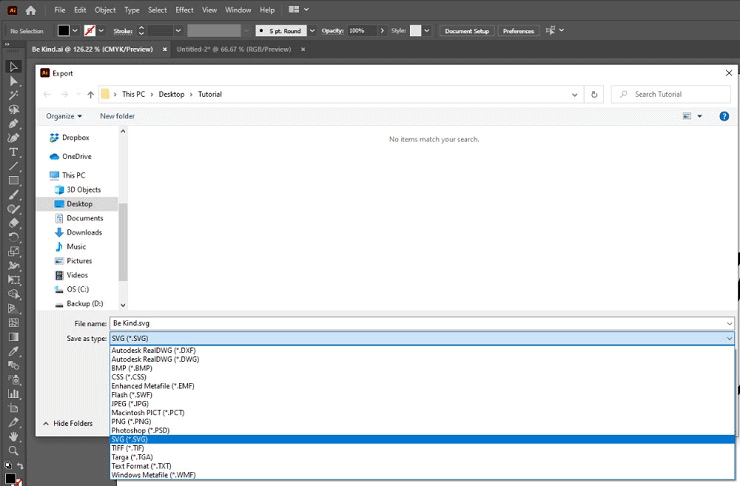
Click on Export. SVG Options window will pop up. Click on OK. Your destination folder should now have a file.

Please note that this SVG file may appear differently depending on your device settings. It may not show up as a . SVG file and will mostly look like a browser file – chrome or HTML document.
Though the appearance may vary, the file is still an SVG file.
How to make layered or multi-layer SVG files?
Following the steps so far, we were able to create a single-layer SVG file.
We will now create a two-layer SVG file from the same design by placing each word in a separate layer.
This way, the customer will have the flexibility to cut the design in multiple colors of vinyl.
When you want to add more elements to a design, like hearts, wreaths, etc., it’s best to provide them in separate layers.
Each Compound Path on your artboard in Adobe Illustrator translates to being a separate layer in Cricut Design Space.
Go back to the Be Kind design on your Adobe Illustrator artboard. Right-click on the text and select Release Compound Path.
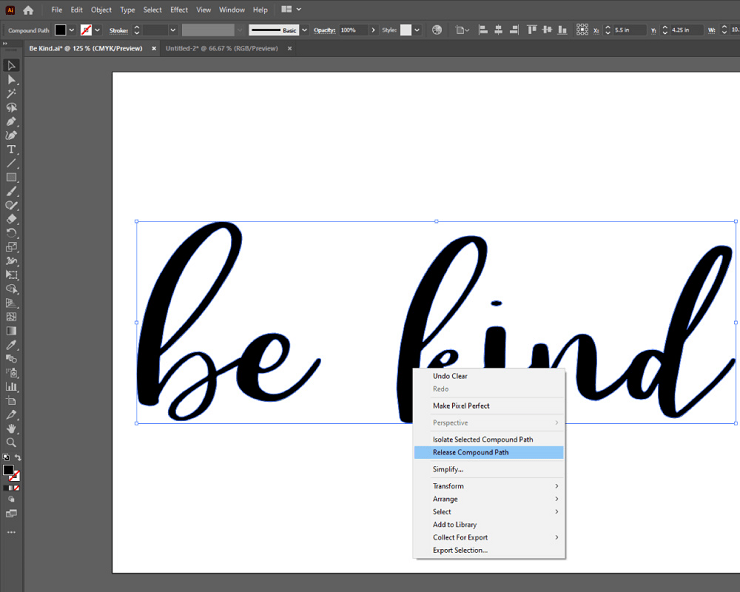
Use your cursor to drag and draw a box around the word Be. Go to Object > Compound Path > Make. Now the word Be is a separate compound path.
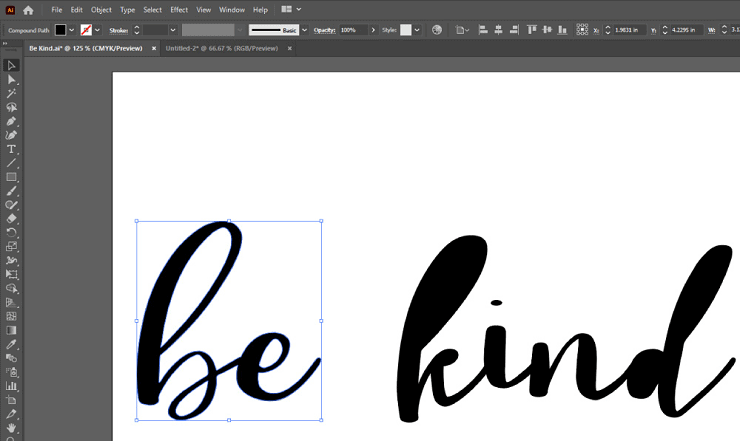
Repeat the same steps for the word Kind.
Now select both the words and go to Object > Group.
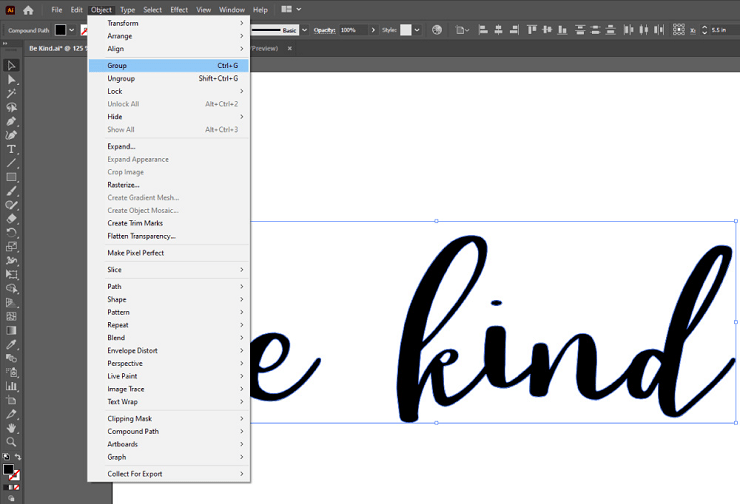
You now have a multi-layer design. Export it as an SVG file.
How to check if the SVG file works in Cricut?
Login to your Cricut Design Space and click on New Project.
Select Upload and click on Upload Image.
In the prompt that comes up next, browse the SVG file you just created and select Upload. I used the two-layer Be Kind design.
The design will now appear in your Recent Uploads section. Select the design and click on Insert Images.
Cricut Design Space will now show you the design in two layers. The design should show up the same way it was created in Adobe Illustrator.
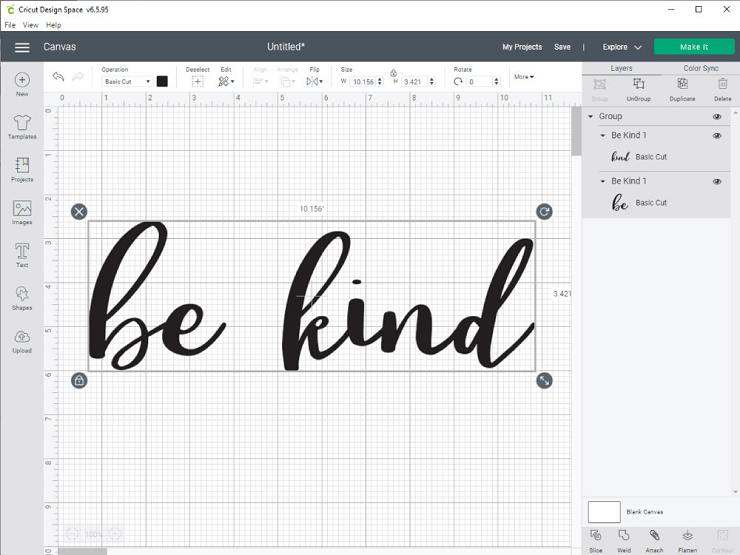
If the design looks any different in Design Space from the one you created, there may be an issue with the compound paths created. Rework the file in Adobe illustrator and check again in Design Space.
Other file formats to provide with SVG files
Along with SVG files, providing DXF and PNG files is a good idea.
DXF files work with the Silhouette Studio Basic Edition. PNG files are for anyone looking only to print the design or to print and cut the design.
Go back to your Adobe Illustrator design file. Click on File > Export > Export As…
In the dropdown, to save as a PNG file, select PNG (*.PNG) and Export. Select Resolution > High (300 PPI), Anti-Aliasing > Art Optimized (Supersampling), Background Color: Transparent, and click on OK.
In the dropdown, to save as a DXF file, select Autodesk RealDWG (*.DXF) and Export. Click on OK.
To check if the DXF file works in Silhouette Studio, import the DXF file and check its design outlines. Please note that none of the layering or coloring information from Adobe Illustrator will be visible in Silhouette Studio. But the customer can make compound paths within the Studio software.
Conclusion
Because they are so versatile, SVG files are becoming an increasingly popular format. These are vector graphics which are perfect for crisp drawing with knives and cutting tools, text, or illustrations.
