This post explains how to remove blank rows in excel, you can learn how to remove blank spaces between rows in excel. All these are very much similar to your daily work when you create a report. I will explain “how to remove blank rows in excel” to help you easily understand this much needed feature in excel.
The learn-how-to-remove-blank-rows process is too simple and straight forward. But it’s very easy to make a mistake. Without going into boring details about how excel works, I’ll try to make a simple explanation how to remove excel blank rows.
Table of Contents
Method 1: Deleting Single Rows
- Find the row that you want to remove. If you only have a row or two that you need to delete, you can quickly do it with your mouse.
- Right-click on the row number that you want to delete. You’ll see the entire empty row get selected when you right-click.
- If you have several blank rows one after the other, click and hold on the first row number, then drag your mouse to the last of the rows you want to delete. Right-click anywhere on the selection.
- Select “Delete”. The empty row will be deleted, and the rows beneath will move up to fill the empty space. All of your rows beneath with automatically be renumbered.
Method 2: Deleting Multiple Rows
- Make a backup of your spreadsheet. When making drastic changes to your spreadsheet, it’s always a good idea to make sure you have a backup that you can quickly restore. Simply copy and paste the spreadsheet file into the same folder to create a quick backup.
- Add a column to the far-right end of the spreadsheet labeled “Blanks”. This method will allow you to quickly filter out your blank rows, ensuring that you don’t accidentally delete rows that contain unseen data. This is especially useful for large spreadsheets.
- Add the blank counter formula to the first open cell in the new column. Enter the formula =COUNTBLANK(A2:X2). Replace X2 with the last column in the spreadsheet before the “Blanks” column. If the spreadsheet doesn’t start in column A, replace A2 with the starting column. Ensure that the row number matches the start of the spreadsheet’s data.
- Apply the formula to the entire column. Click and drag the small box in the corner of the cell to apply the formula to the entire Blanks column, or just double-click to apply automatically. Each cell in the column will automatically fill with the number of blanks in that row.
- Select the entire Blanks column and click “Sort and Filter” → “Filter”. You’ll see a little drop-down arrow appear on the header cell.
- Click the drop-down arrow to open the Filter menu. This menu allows you to select how you want to filter the display.
- Uncheck the “Select All” box. This will deselect all of the different values, which will be selected automatically.
- Check the box with the value equal to the number of columns in your sheet. Click “OK”. Checking this box will only display rows which have blanks in every cell. This will ensure that you do not accidentally delete rows that have valuable data along with some blank cells.
- Select all of the blank rows. You should only see rows that are only blank cells. Select all of the rows so that they can be deleted.
- Delete the selected blank rows. After selecting all of the blank rows, right-click on your selection and choose “Delete”. The blank rows will be removed from the spreadsheet.
- Turn off the filter. Click the Filter button on the Blanks row and select “Clear Filter”. Your spreadsheet will return, and your blank rows will be gone. All of your other data will be preserved.
- At this point, you can delete the Blanks column, or you can keep it for future empty row management.
Method 3: Remove Blank Rows With The VBA Code
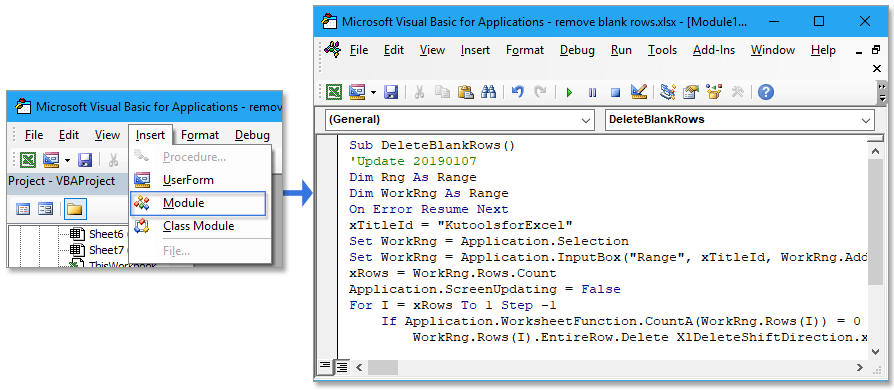
1. Press Alt + F11 key to enable Microsoft Visual Basic for Applications window.
2. Click Insert > Module to create a new Module script, copy and paste below code to the script.
VBA: Remove empty rows
| 1234567891011121314151617 | Sub DeleteBlankRows()'Update 20190107Dim Rng As RangeDim WorkRng As RangeOn Error Resume NextxTitleId = "KutoolsforExcel"Set WorkRng = Application.SelectionSet WorkRng = Application.InputBox("Range", xTitleId, WorkRng.Address, Type:=8)xRows = WorkRng.Rows.CountApplication.ScreenUpdating = FalseFor I = xRows To 1 Step -1 If Application.WorksheetFunction.CountA(WorkRng.Rows(I)) = 0 Then WorkRng.Rows(I).EntireRow.Delete XlDeleteShiftDirection.xlShiftUp End IfNextApplication.ScreenUpdating = TrueEnd Sub |
3. Press F5 key to run the code, then select a range you use to remove blank rows in the popping KutoolsforExcel dialog.
4. Click OK. Now the empty rows in selection have been removed.
Note:
With this VBA code, you’d better remove blank rows in a range but not in the whole worksheet, or Microsoft Excel may get stuck.
Method 4: Remove Blank Rows With The Helper Column And Filter Function
1. Insert one column before your data range, take inserting Column A as instance, then type this formula =B3&C3&D3 into A3 to combine data in row3, see screenshot:
Tip: If your data across Column B3 to Column N, adjust the formula to =B3&C3&D3&E3&…&N3.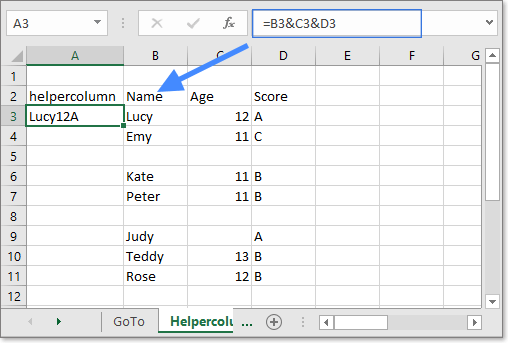
2. Then fill the formula to cells by dragging the auto fill handle down.
3. Then click Data > Filter.
4. Then click the Filter icon at the helper column, check Blanks option only in the drop-down list. See screenshot: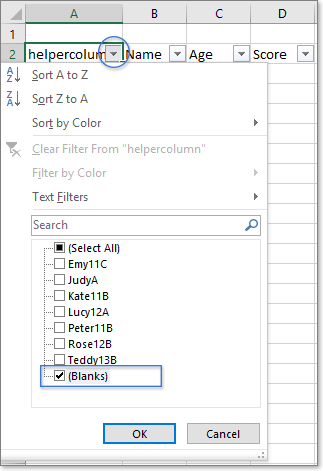
5. Click OK, the all blank rows have been filtered out.
6. Select the filtered rows, click Home > Delete > Delete Sheet Rows to remove the blank rows.
7. Then click Data > Filter again to disable Filter function.
Note:
Compare to method A and method C, this method can exactly remove blank rows and easy-to-handle for every Excel users. However, if there are dozens of columns in your data, this method will be a little tedious.
Method 5: Delete Blank Rows Using Go To Special
Selecting and deleting rows manually is OK if we only have a couple rows to delete.
What if there are many blank rows spread across our data? Manual selection would be a pain!
Don’t worry, there is a command in Excel to select all the blank cells for us.
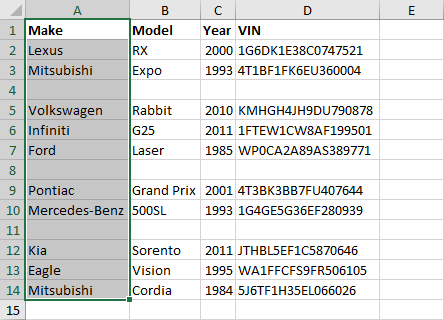
First, we need to select a column of our data including all the blank rows. The easiest way to do this will be to select the first cell (A1 in this example) then hold the Shift key and select the last cell (A14 in this example).
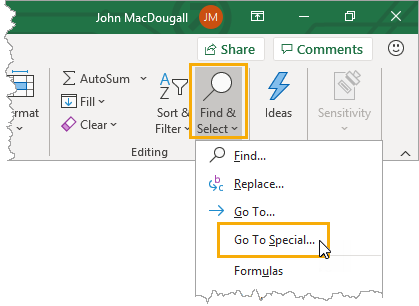
Now we can use the Go To Special command to select only the blank cells. Go to the Home tab ➜ press the Find & Select command ➜ choose Go To Special from the menu.
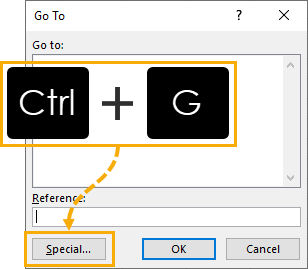
There’s also a handy keyboard shortcut for the Go To menu. Press Ctrl + G to open up the Go To menu then click on the Special button to open up the Go To Special menu.

Whether we open up the Go To menu then click Special or we go directly to the Go To Special menu, we will arrive at the same Go To Special menu.
Now all we need to do is select Blanks from the options and press the OK button. This will select only the blank cells from our initial column selection.
Now we need to delete those selected rows.
- Use any delete rows method from the Delete Blank Rows Manually section.
- Right click ➜ Delete
- Home tab ➜ Delete ➜ Delete Sheet Rows
- Ctrl + – keyboard shortcut
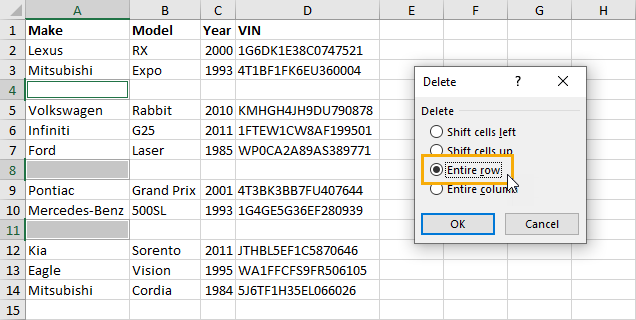
- In the Delete menu select Entire row and press the OK button.
Like magic, we can find and delete hundreds of blank rows in our data within a few seconds. This is especially nice when we have a lot of blank rows scattered across a long set of data.
Conclusion
There are days when Excel just doesn’t behave itself. You know the scenario: you perform an action in Excel and you get a blank row in its place. Maybe there was a formula error in the cell and it empty out and create a blank row in the table above or below it. Or maybe you’ve cut and pasted a table from an external document and Excel created an extra space between the rows which is messing up your data. Whatever the cause, there are quick ways to get rid of any blank rows that are causing you problems.