Everyone of us has played with minecraft. Since the first time we hear about it, we would like nothing more than to play on a server of our own, to be able to use our imagination and create our own worlds. What if I told you that you can actually build your very own minecraft server?
How to Create a Minecraft Server – So you want to play Minecraft, but you also want to play with your friends? Playing online by yourself is fun, but there’s nothing like getting together with a community of people that can share, trade and work together. Plus, playing a multiplayer game is a great way to meet new people.
Have you ever wondered how to create a minecraft server? Minecraft is one of the most popular and best games today and if you’re tired of playing the same maps and want to make your own, follow these steps
Table of Contents
What is a Minecraft server
Minecraft is a brilliantly crafted sandbox game that allows people to fight, survive, explore, and build virtually anything they want. One of the best features of the game is the multiplayer option that allows you to go co-op with your friends and other people.
Not only can you connect to other worlds on your friends’ and family’s devices through LAN, but you can also purchase one of Microsoft’s Minecraft Realms which are worlds where ten players can play simultaneously. By far, the best option, however, for multi-playing on Minecraft is through servers, where, theoretically, an infinite number of players can share the playfield with other Minecrafters. Minecraft servers are like upgraded sandboxes where modifications can be made to the game, making the playing experience way more enjoyable.
On servers, players can engage in minigames, meet new people, explore, build, and compete in challenges with other Minecrafters. Every year, thousands more Minecraft servers are created and grow rapidly. The largest Minecraft servers have millions of fans all across the globe and hundreds of players on a daily basis. For these reasons, servers are extremely popular, and many people want to set up their own servers and grow the latest and greatest Minecraft multiplayer world.
Creating a Minecraft server can be quite cheap, but depending on your requirements and how many players you want on the world at a time, it can actually get quite expensive. So, in this article, we’ll explain how to make a Minecraft server in 2021 and invite friends to join your world! We hope this article helps you! But before diving into that, let’s first understand how mc servers work, the costs associated, and the best 3 options to choose from. So, let’s get started.
How does a Minecraft server work

A server on the popular game Minecraft works very much the same way as really any other server or computer that is connected to the internet and communicates with other devices. Essentially the internet is one huge network where computers communicate data. Web servers are huge computers that process a lot of requests and display web pages or multiplayer game content to anyone who makes a request.
However, just because servers typically involve a lot of computers and processing power, this doesn’t mean that you need to invest in a huge server computer to host your own amazing Minecraft multiplayer world. Since servers can process many requests at once, they make it possible for a world to be played on by numerous Minecraft players simultaneously and update automatically, making for an excellent experience.
Although most people who want to make Minecraft servers usually buy one from a specialized service provider who owns their own server computers, which servers can be hosted on, it is not uncommon for amateurs to host servers on their own devices. For example, if you have a spare laptop or PC lying around that is relatively fast and has decent memory (Random Access Memory or RAM), you can configure it to act as a server and hold a Minecraft world that many other people can connect to.
On the internet, computers and servers (which are really just computers themselves) use unique strings of digits interspersed with periods called Internet Protocol, or IP, addresses to identify themselves and establish safe connection pathways with other devices on the World Wide Web. To connect to a server on Minecraft, you need to find its IP address, enter it, and you’ll be connected and sent straight through to the Minecraft world! This concept also applies to how to create a Minecraft server.
If you run it on a spare laptop or desktop computer, it’ll run on the IP of your Wi-Fi network. However, if you do it with a qualified and reputable Minecraft server provider, they’ll have servers that can provide you with a unique IP address that will allow your players to connect to your multiplayer world!
How to Create a Minecraft Server
1. Verifying the Latest Version of Java
Since Minecraft is a Java-based game, our first step is to make sure you have the latest version of Java. If you don’t, download Java here.
Need Help Troubleshooting?
Refer to the Minecraft online server set up Wiki article. PLEASE NOTE: Some solutions to server issues require adjusting critical settings on your computer. If this is done improperly, you can damage your computer.
2. Minecraft_Server.jar
First, you’ll need the server files. You can get these for free from Mojang’s site:
1. Go to the Minecraft Server Downloads page and download minecraft_server.1.11.jar.
2. Once the download finishes, copy minecraft_server.1.11.jar into a new folder on your desktop and call this folder “Minecraft Server”.
3. Double-click minecraft_server.1.11.jar to run it.
You’ll see some new files appear in the folder along with it.
3. Version of Minecraft
If Minecraft updates to a new version, the directions above will still apply but “1.11” will be replaced with whatever the new version number is!
4. Batch File to Run Server
1. Right-click inside the Server folder where you put the Minecraft_Server.1.11.jar.
2. Select New > Text Document.
3. Name the new document “Run”.
4. Inside the Notepad document, paste the following line: 1 cmd /k java ‐Xms1G ‐Xmx1G ‐jar minecraft_server.1.11.jar
Important
If you’re using a different version of the server, change “minecraft_server.1.11.jar” to match the name of the version you’re using.
Now Save As a batch file, which is a file Windows uses to run command line commands.
5. Click File > Save As.
6. In the field Save as Type, select All Files.
7. Set the file name to “Run.bat”.
Important
Make sure you remove the .txt at the end of the filename.
5. Agreeing to the EULA
Mojang provides a license agreement you must agree to before launching a Minecraft server. You’ll need to edit the file eula.txt to indicate that you agree.
1. Double-click eula.txt.
You can read the EULA here or by copying and pasting the text from the file.
2. Change the line eula=false to eula=true.
6. Launching Your Server
Now you’re ready to launch your server!
Double-click Run.bat and your server will launch.
A window will appear with some info about your server. As long as you leave this window open, your server is running and players will be able to connect!
7. The Server Window
Your server provides some information to help you keep track of what’s going on, even if you’re not in-game.
1. You can see how much memory the server is using in the Stats panel.
2. You can check who is currently connected to the server in the Players panel.
3. You can see server messages and player chats in the Log and Chat panel.
4. You can use the field on the bottom-right to enter server commands.
Server Commands
Server commands allow advanced users more control over their server. You can find a list of all possible commands here.
8. Joining Your Server
Now it’s time to join your Minecraft server.
1. Run Minecraft.
2. On the main menu, click Multiplayer.
3. Click Add Server.
4. Name your server in the Server Name field.
5. Type “localhost” in the Server Address field.
6. Click Done.
7. Select your server and click Join Server.
You should now be able to play on your home server. Next, we’ll set up the internet connection so other players can connect to it.
9. Port Forwarding
The next step in the process requires adjusting the settings on your router so other users can access your computer through it. This process will be different for everyone, because it’s based on the kind of router you have.
1. Before you begin, read this page on portforward.com that offers some basic information on port forwarding.
2. Go to this link for a list of port forwarding guides.
3. Select your router’s make and model from the list and follow the instructions provided.
Is Your Router Not on the List?
If you can’t find your router on the list on that site here’s a couple things to try:
- If you can find your manufacturer but not the model: Try the directions for the closest number to your model you can find. They’re often similar processes.
- Search for your router’s model and “port forwarding” on the web.
- Contact your router’s customer support and ask how to forward ports.
10. Finding Your External IP Address
Once you’ve forwarded your ports, you’ll need to find your external IP.
1. Open a browser and go to google.com
2. Type “external ip” in the search bar and press Enter or Return.
3. Google will tell you your external IP address.
Your external IP address will either be IPv4 or IPv6 and will look like one of the examples below:
Sample IPv4 address: 12.34.456.789
Sample IPv6 address: 2001:0db8:0a0b:12f0:0000:0000:0000:0001
When you find your external IP address, save this number — you’ll need it for other people to connect to your server.
11. Connecting to Your Server
Now that you’ve port-forwarded your connection, other players can connect using your external IP address. Have players joining your server follow the steps below:
1. In Minecraft, click Multiplayer.
2. Click Add Server.
3. Enter a server name.
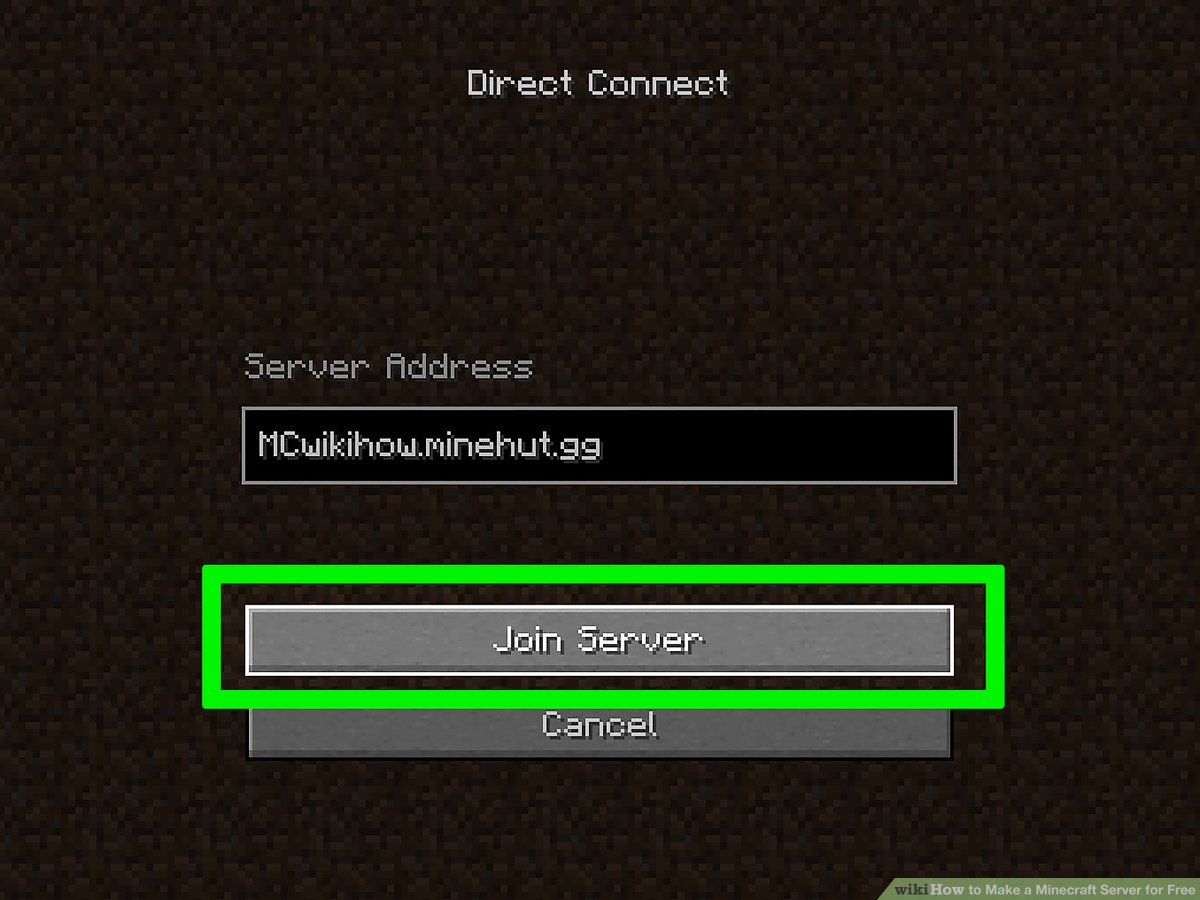
4. Enter the server address.
This will be your external IP followed by the port number: 25565 This will look like the address in the image on the right.
If you have an IPv6 address, enclose your address in [ ] characters like this: [2001:0db8:0a0b:12f0:0000:0000:0000:0001]:25565
5. Click Done. Minecraft will now try to connect to the server. Once connected, select the server and click Join Server.
Inviting Players to Join
Anyone you give your external IP address to will be able to play on your Minecraft server. Make sure that you trust whomever you invite to play. It’s safest only to invite people you know. Ask your parents before inviting new players to join.
12. Server.properties File
You can also adjust some settings of the game using the file in the Server folder called Server.properties.
Open the file with any text editor, and you can change the properties of your Minecraft world by editing lines of the file.
The most common properties you might change are:
- gamemode=0: change this to gamemode=1 to put your server in creative mode.
- max‐players=20: change this number to increase or decrease the number of players that can join your server at one time.
Conclusion
Minecraft has become one of the most popular computer games ever played, with over 112 million copies sold! People play Minecraft online or on their mobile devices. With millions of Minecraft servers, you can host your own server for free.