Business email is an email address directly at your business website where you can send the mail to it. Business email is an important part of any business which makes it need special attention when considering how to create business email. It is very simple to set up an email address, but since there are so many benefits, you should likely know how exactly to create business email. Setting up an email address for your company does have many unique benefits including the ability to have a unique domain extension.
Table of Contents
What is a Business Email Address and Why You Need it?
A professional business email address has your company name instead of the generic gmail or yahoo account, for example: [email protected]
Most beginners use generic free business email accounts without a domain name which isn’t very professional. For example: [email protected] or [email protected].
Since anyone can create these generic email accounts, it becomes harder for customers and other businesses to trust such email addresses as legitimate business email accounts.
Below are the top 4 reasons why you need a professional email address for your business:
- A custom business email address looks more professional.
- It is also short and easy to remember.
- A professional business email address helps you earn customer’s trust as a legitimate business.
- Sending emails with your own business name allows you to promote your brand with each email you send.
The best part is that you can get your own custom business email address for free, which means there is no excuse for not getting it.
If you want your customers and other businesses to take you seriously, then you need to start using a professional business email address, immediately.
What Do You Need to Create a Business Email Address?
You will need to have domain name and a website to create a free business email address.
After that, you will need an email service provider to handle your business emails.
There are a few different solutions that you can use to create a professional business email address.
We will show you two different methods, and you can choose the one that best fits your needs.
The first method is free and fairly easy to setup whereas the second method has a small fee, but it offers a lot more features.
Methods On How to Create Business Email
Method 1: Using GoDaddy
- Open the GoDaddy package selection page. Go to https://www.godaddy.com/hosting/web-hosting/ in your computer’s web browser.
- If you don’t have an account with GoDaddy, you can create one by clicking Sign In in the top-right corner of the page, clicking the Create an account link at the bottom of the page, and following the prompts.
- Sign up for the basic package. To do so:
- Scroll down and click Add to Cart under the “Economy” heading.
- Select additional plan options if desired.
- Scroll down and click Continue With These Options
- Add a domain if you like, or click No thanks to pass.
- Sign into GoDaddy if you aren’t already signed in.
- Enter your billing and payment information, then check out.
- Open your GoDaddy account. Go to https://www.godaddy.com/ and click the person-shaped logo in the top-right corner of the page, then click Account Settings in the resulting drop-down menu.[1]
- Click My Products. It’s a tab in the upper-left side of the page.
- Scroll down to the “Workspace Email” heading. This option is near the middle of the page.
- Click Manage All. It’s to the right of the “Workspace Email” heading. Doing so will open a new page from which you can create your .com email address.
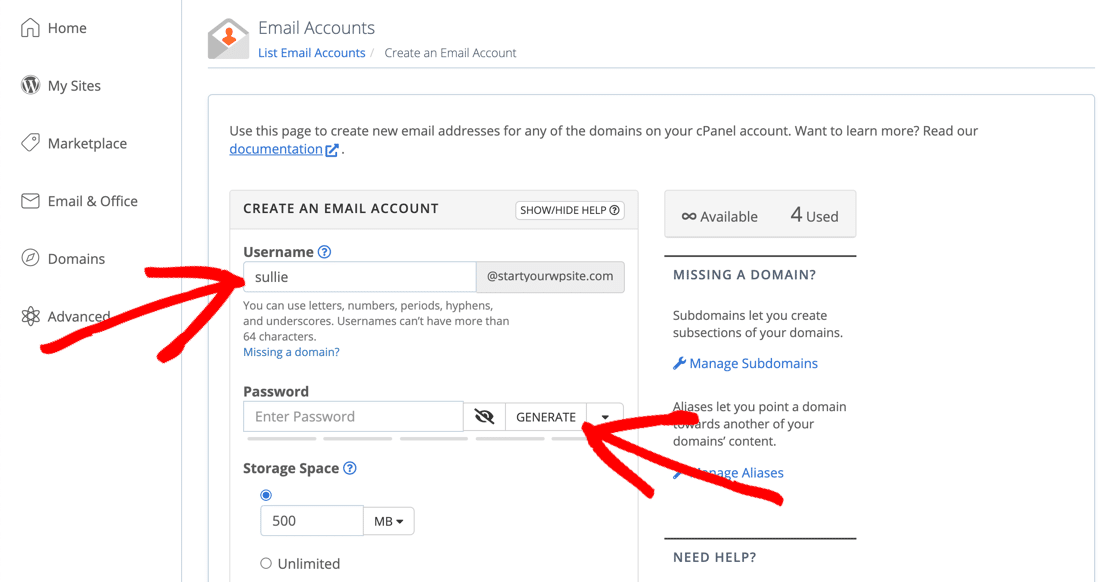
- Enter your preferred email address. In the “Email address” text box, type in the email address that you want to create, making sure to use your preferred domain name.
- Enter a password for the email address. Type your preferred password into the “Password” and “Confirm password” text fields.
- Click Create. This option is at the bottom of the page. Doing so will create your email address, though it will take a few minutes to be ready for use.Advertisement
Method 2: Using Zoho
- Open the Zoho Mail site. Go to https://www.zoho.com/mail/ in your browser. Zoho Mail is a site that offers free hosting for one email address, allowing you to create one “.com” email for yourself.
- Click SIGN UP NOW. It’s a red button on the right side of the page.
- Scroll down to the “FREE PLAN” heading. You’ll find this option near the bottom of the page.
- Click GET STARTED. It’s in the “FREE PLAN” section. Doing so will take you to the beginning of the setup process.
- Enter your website’s address. Type your website’s domain address into the text field in the middle of the page.
- Click Add. It’s to the right of the text field.
- Enter your account details. Fill out each of the boxes on this page, making sure to use a working phone number at which you can receive text messages.
- Check the “I agree” box. It’s near the bottom of the page.
- Click Sign Up. This option is at the bottom of the page. Doing so will prompt Zoho to send a verification text message to your phone number.
- Verify your account. To do so:
- Open your phone’s Messages app.
- Open the text from Zoho.
- Note the verification code in the text.
- Enter the verification code into the text box in the middle of the setup page.
- Click VERIFY MY MOBILE
- Click the CNAME Method tab. It’s at the top of the page. This is the easiest method of website verification.
- Select a website host. Click the drop-down box near the top of the page, then click your domain host’s name (e.g., GoDaddy) in the resulting drop-down menu.
- Verify that you own your domain. While this process will vary slightly depending on your selected domain host, you’ll generally follow these steps:
- Copy the “Name / Host / Value / CNAME” code by selecting it and pressing Ctrl+C (Windows) or ⌘ Command+C (Mac).
- Open your website’s domain settings page (or DNS Management, etc.).
- Click ADD or NEW, then select CNAME.
- Set the “Type” value to CNAME
- Paste the copied code into the “Name”, “Host”, “Value”, or “CNAME” text box by pressing Ctrl+V (or ⌘ Command+V).
- Copy the “Value / Points to / Destination” code.
- Paste this code into the similarly titled text box in the settings page.
- Save your changes.
- Click Proceed to CNAME Verification, then click Verify Now when prompted. If you don’t see this prompt, wait for a few minutes before trying again.
- Enter a username. In the text box at the top of the page, enter the name that you want to use with your customized email address.
- Click Create Account. It’s a grey button below the text box.
- Skip to the “Configure Email Delivery” page. Click Skip in the lower-right side of the page twice.
- Set up your domain service to send email to Zoho. This is what will guide incoming email into your inbox. To do so:[2]
- Open the domain service’s settings page.
- Click ADD or NEW, then select MX or MX Record
- Type @ into the “Host” field.
- Type mx.zoho.com into the “Points to” field.
- Type 10 into the “Priority” field.
- Save this record by clicking Save or OK
- Repeat this process with the @ symbol, the “Points to” value mx2.zoho.com, and the priority level 20.
- Follow any instructions on the “Email Migration” page if necessary. If you want to move your existing inbox’s contents over to Zoho, you’ll have to follow the instructions on the “Email Migration” page to complete the process.
- You can also just click Skip in the bottom-right side of the page to skip this step.
- You can find specific instructions on using Zoho with your selected email platform on the “Mail Client Configuration” page as well.
- Access your Zoho inbox. You can go to https://workplace.zoho.com/ and click Mail to view your Zoho inbox, which functions like any other email service.
- There’s also a free Zoho Email app that you can download and sign into on iPhone and Android.
Conclusion
The email address is probably the most common element of setting up a new business. You need to get it right from the beginning, because the future success of your business depends on it. The easiest way to get an email address for your business is to obtain a free work-at-home email address and use this for your business.