How to Remove Instagram Account From Phone – If you are looking for the simplest instructions on how to Remove an Instagram account from your smartphone, then you’ve come to the right place. Are you experiencing any issues with your phone? Or perhaps that new app update has left your phone a mess. Or maybe you are sick of those annoying notifications that pop up on your home screen no matter what apps you open first. Well, all of these reasons apply to deleting Instagram from your mobile device.
We know there are many people out there struggling to get rid of a single account within the Instagram Application where you are able to choose ‘log out’ but the account still remains within your App – this is an extremely common issue so you are not alone! This is annoying because you have either reached the maximum allowable account limit and need to clear up some space or simply because you want to stop getting notifications from a specific account. Either way, here is a simple guide on how to remove an instagram account from your mobile application.
Before we get started we thought for those of you out there who are competent within Instagram and want to skip all of the long-winded explanations of each step then these are the simple steps you need to follow in order to fully remove an account from your Instagram App. Before doing these steps, please ensure you are on the profile of the specific account you wish to remove:
- Go to ‘Settings’
- Click ‘Security’
- Click ‘Saved login information’
- Turn OFF ‘Saved login information’ (and choose ‘Remove’ on additional popup)
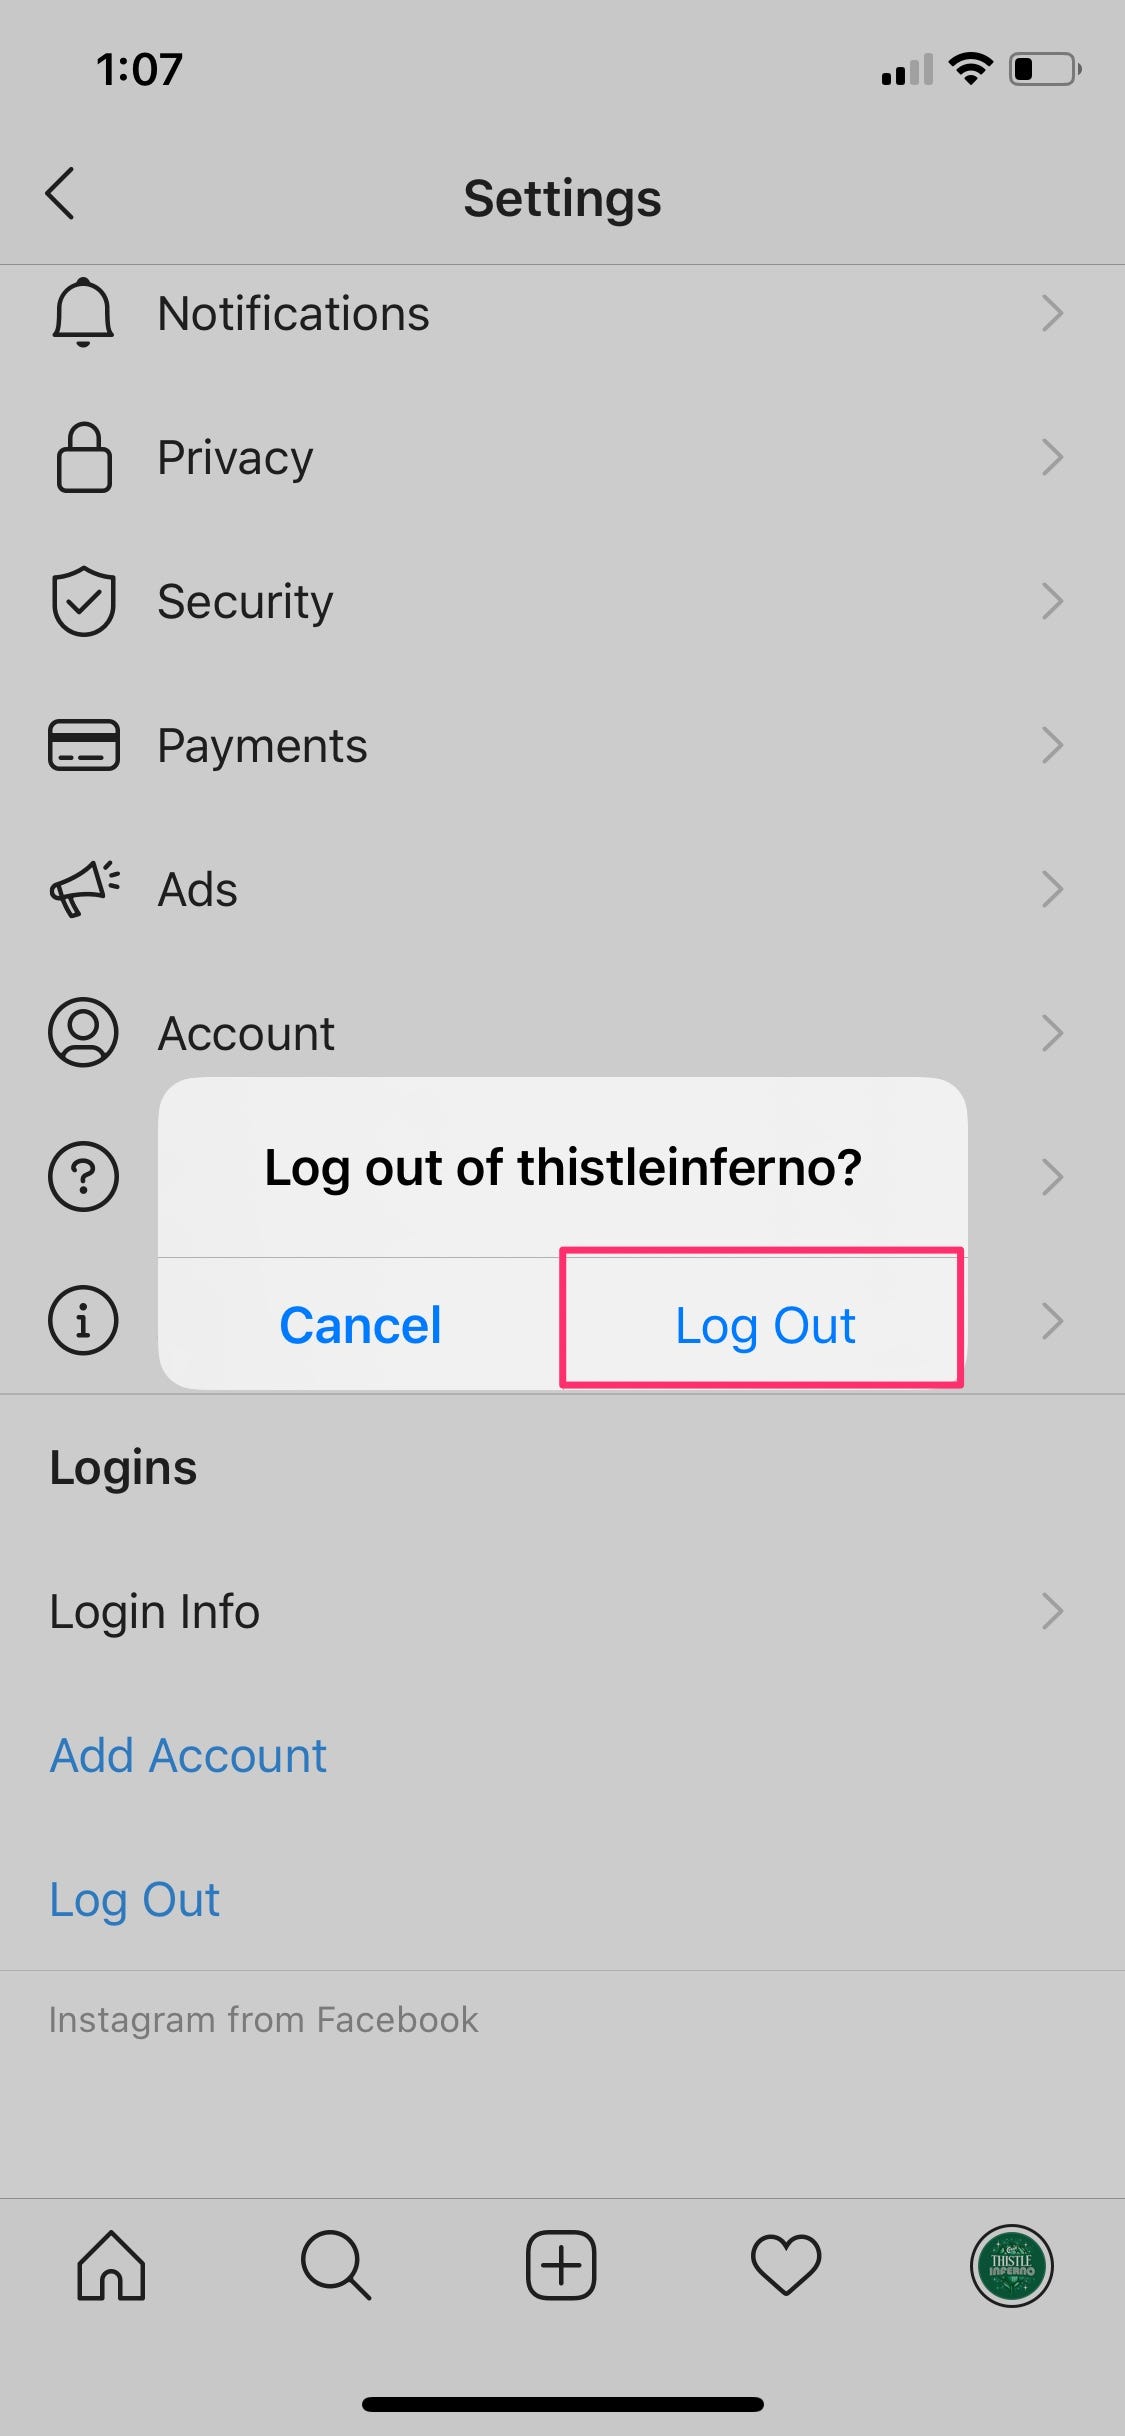
- Go to ‘Settings’, scroll down and select ‘Log Out’ (then click ‘Log Out’ twice more on the following 2 popups)
Table of Contents
Step 1: Go to Settings
As user experience design goes, even this is quite a tricky area to find within the app!
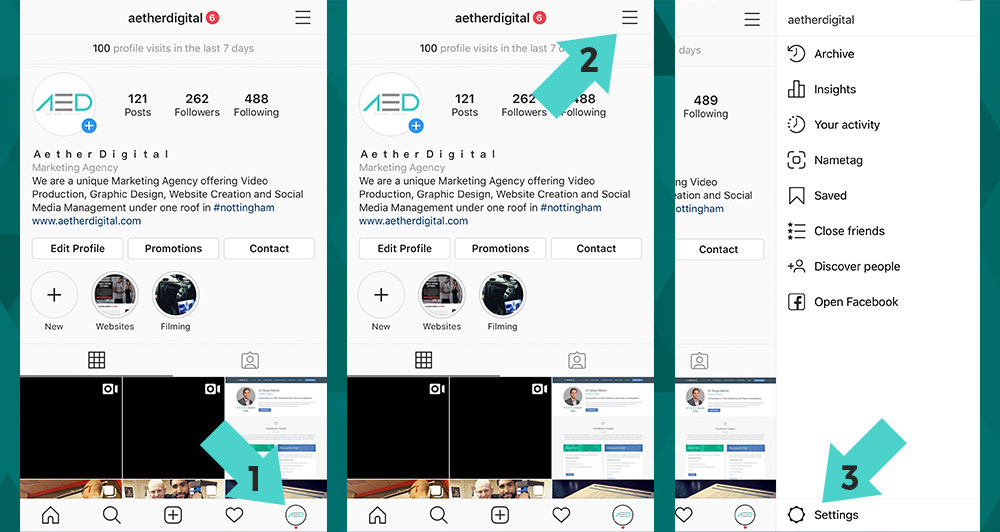
Firstly ensure you are in the profile section of the account you want to remove. This can be done by clicking the icon in the bottom right of the app, then click the top right menu icon (three lines) and finally click the bottom right ‘Settings’ button from the pop-out menu.
Step 2: Click ‘Security’
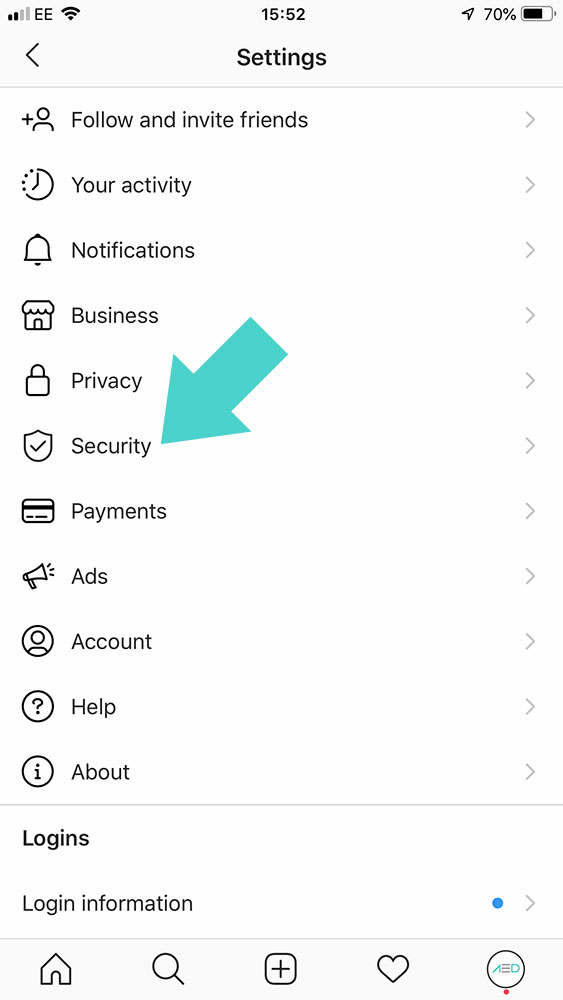
Once in the Setting menu, locate and click on ‘Security’.
Step 3: Click ‘Saved login information’
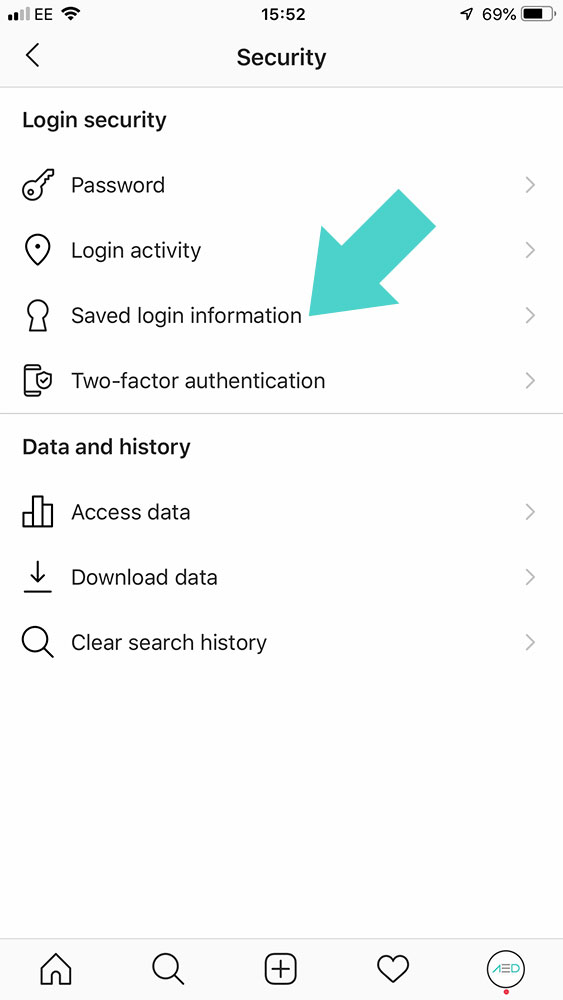
With the ‘Security’ menu now open, click ‘Saved login information’
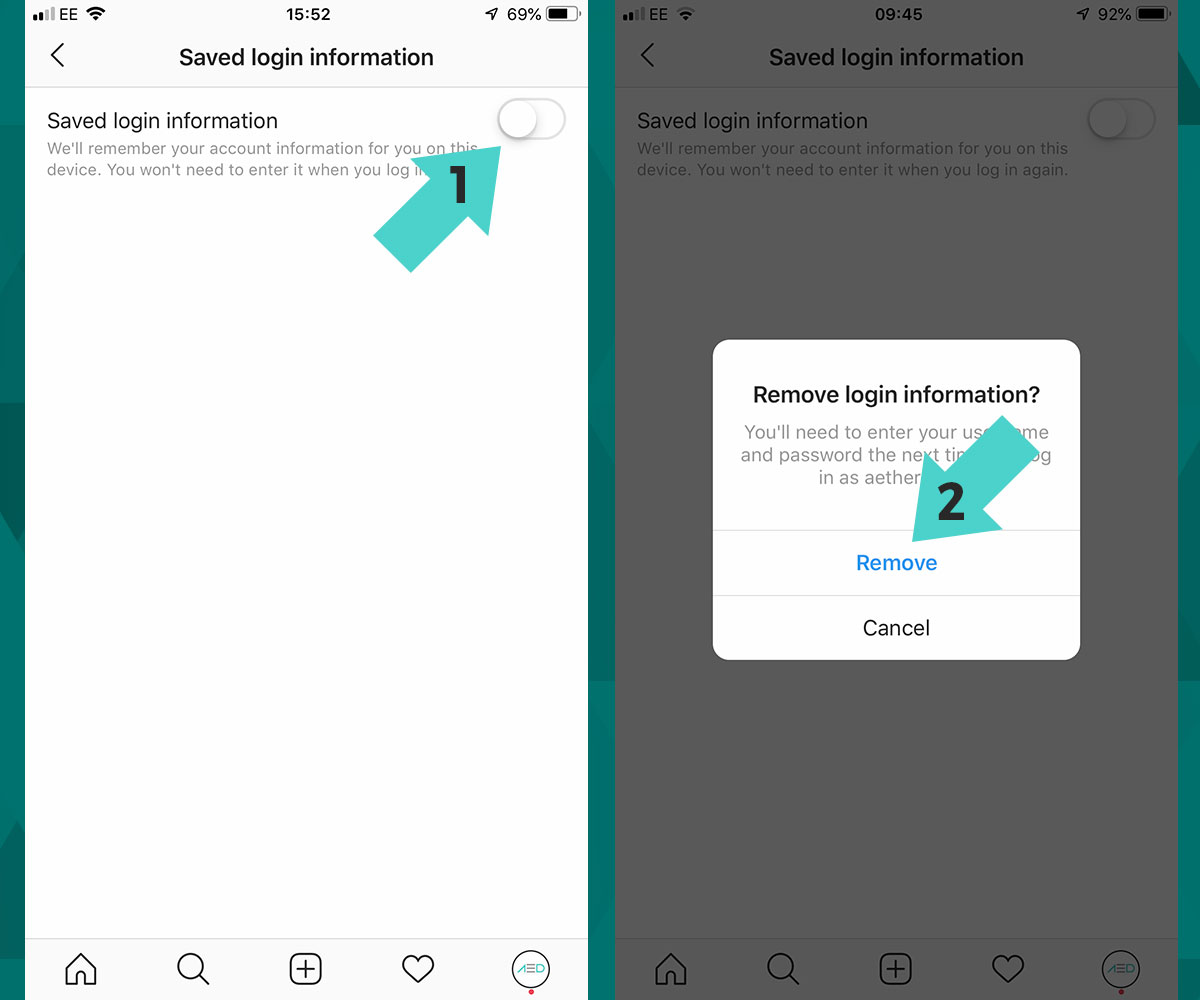
Step 4: Turn OFF ‘Saved login information’
You’ll now see a simple on/off button tab – please make sure the ‘Saved login information’ is turned OFF (‘greyed out’ like the image below).
Once you turn this option OFF you’ll have a popup appear asking ‘Remove login information?’ – choose ‘Remove’.
Step 5: Log Out of Account
Once you have turned ‘Saved login information’ OFF you then just need to go and logout of this specific account.
So again, go back into the account’s settings menu (as shown in step 1) then once inside, scroll down to the bottom of this menu (yes, annoyingly on most mobile devices this section is hidden – typical!) and click ‘Log Out’.
All of your linked Instagram Accounts will then popup from the bottom of the screen (please note for data-protection we have blurred out the accounts in the image below, yours will actually show all your accounts listed clearly) the system will automatically highlight the account you want to remove so simply press ‘Log Out’ at this stage.
Finally, it will as ‘Log out of [your account name]’ – just click ‘Log Out’.
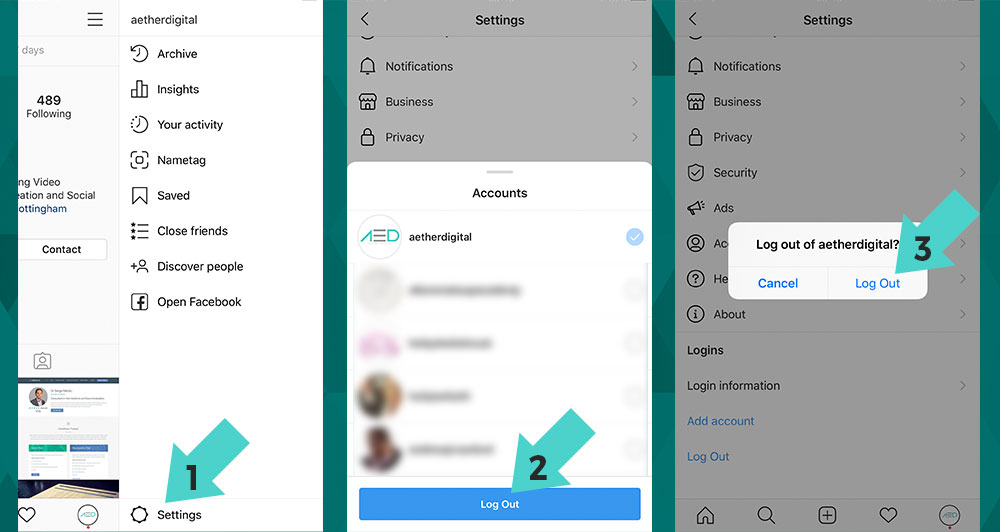
Once you have followed all of those steps you’ll now see that the account has been completely removed from your list of accounts so you can add another account if you need to or relax in the knowledge that you no longer have that account on your app any more. It’s also worth noting at this stage that should you ever want to re-add the account you just need to login as normal again.
We’re not sure why the Instagram UX designers have made this such a complicated task but as long as you follow those simple steps you’ll now have removed an account from the Instagram App.
How to Remove Instagram Account From iPhone App
Removing an account from the Instagram app on iPhone is simple and only takes a few steps. Instagram allows you to have up to five accounts and switch among them without logging out.
It’s important to note that removing an Instagram account isn’t the same as deleting it. It won’t show up on your profile anymore when you remove it, but you can still log back in anytime you want. Also, other people can still see your account once you remove it from your profile.
If you have more than one Instagram account on your iPhone and you want to remove one, follow the steps below:
- Open the “Instagram” app.

- Make sure you’re currently on the account that you want to log out of.

- Tap your “profile” icon in the bottom-right corner.

- Tap the “hamburger” icon (three horizontal lines) in the top-right corner.

- Select “Settings.”

- Choose “Log Out.”

- You’ll see a message confirming that you want to log out. Select “Log Out.”

- You might notice that even though you’ve logged out of your account, the account will be there the next time you open the app. This can happen due to enabled saved login information. Open the Instagram app on your iPhone.

- Ensure you’re currently in the account you want to remove.

- Tap the “profile icon” in the bottom-right corner, not the big one towards the top.

- Select the “hamburger icon” in the top-right corner.

- Choose “Settings.”

- Tap on “Security.”

- Choose “Saved Login Info.”

- Move the “slider button” to turn off saved login info.

By following the steps listed above, you ensure that Instagram doesn’t remember the account info on your device. Now, you can repeat the steps mentioned above to log out.
As previously mentioned, your Instagram account is removed from your device but remains an active account. Therefore, you can log back in anytime by entering your username and password. People can still search for your Instagram profile and view it when you delete it from your smartphone because you still have the account.
How to Temporarily Disable an Instagram Account
If you want more than just removing an Instagram account from your smartphone app, you can take a temporary break from Instagram altogether by disabling it. Instagram will hide your profile, photos, comments, likes, etc. until you log back in on any device.
To temporarily disable your Instagram account, you have to log in using a computer or a mobile browser.
- Open a browser on your smartphone or PC and head to the Instagram login page. Log into the account you want disabled. If already logged into a different account, sign out and sign into the correct one.

- Tap/click on your “profile icon” in the top-right corner.

- Choose “Profile” from the list of options.

- Tap/click on “Edit Profile” next to your username.

- Scroll down and click or tap on “Temporarily disable my account” in the bottom-right corner.

- Instagram will ask you what the reason is for disabling your account. Choose an option from the drop-down list.

- Retype your password.

- Tap or click on “Temporarily disable my account.”

Conclusion
You can keep your account temporarily disabled for as long as you like. You can reactivate it at any time by logging back in. However, there is one restriction.
Instagram currently only allows you to disable your account once per week. So if you disable it, log back on, and then decide you want to disable it again, you’ll have to wait a week to do so.
